Categories: Expert
Motivation
Have you ever encountered a minor inconvenience and decided to over engineer a solution to it? Do you enjoy starting projects and then getting way over your head? If you do, this is the project for you!
My friends and I have love to play music at
social gatherings
but hate slaving a laptop or a phone to an external speaker to play music. We need a small discrete device that can play music off of our favorite streaming services.
Enter the Spotify-Pod. A small single board computer, an external audio card, a small LiPo battery and a small LCD screen crammed inside of the casing of an old Ipod (clickwheel model). This small device is exactly what my friends and I are looking for. Unfortunately, I was unable to create the final version of the Spotify-Pod as the project ran into multiple technical hurdles… More on that later.
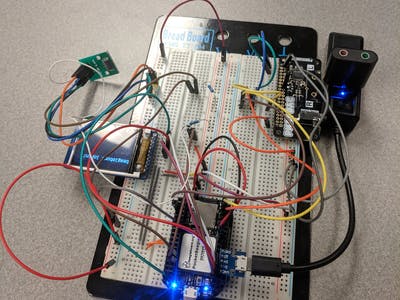
Schematics
A fritzing diagram of the project is included below:

Fritzing diagram? I meant spaghetti monster. There are quite a few connections between the PocketBeagle and the other components. In addition, the eagle eyed among you might notice that the Pimoroni pHAT DAC is not in the Fritzing diagram. Unfortunately, the pHAT DAC is not open source, so there is no Fritzing Part available. Instead, I used a placeholder board that has a similar pinout as the pHAT DAC. A simpler schematics view can be seen below:
Debian Linux
Once my PB was all wired up, I need to install Linux on an SD card. For this project, I used the Debian 9.5 IoT image from
BeagleBoard.org
(SPOILER ALERT: This isn’t the best Linux Distro to use for this project. Again, more on that later.).
To setup Linux on my PB I followed
BeagleBoard.org’
s excellent tutorial:
https://staging.digitalblender.co/getting-started#update
Next, I connected the PocketBeagle to the internet.
Ofitselfso.com
has good tutorial on sharing Window’s networking and configuring the PocketBeagle to connect to the internet:
https://ofitselfso.com/BeagleNotes/HowToConnectBeagleboneBlackToTheInternetViaUSB.php
I would suggest scripting the majority of the commands from
Ofitselfso.com
‘s instructions. My script is only four lines long and runs every time the PB boots up.
I also setup a WiFi dongle on my PocketBeagle, so it could run Mopidy without being connected to my laptop. To do this I followed this tutorial from
teachmemicro.com
: https://www.teachmemicro.com/pocketbeagle-wifi/
Adding a micro-USB connector to the PocketBeagle ended up being necessary to do the work around later in the project. If you’re following along, I’d suggest doing this step.
For this project, I also need to load Python, Adafruit’s BBIO Python Library, and Robert Nelson’s BeagleBoard Boot Overlay program onto the PocketBeagle. To install Python, I used the following lines of terminal code:
sudo apt-get update

sudo apt-get install build-essential python-dev python-setuptoolspython-pip python-smbus python-pip python3-pip -y
Next, I installed Adafruit’s BBIO Python Library:
git clone git://github.com/adafruit/adafruit-beaglebone-io-python.git

cd adafruit-beaglebone-io-python

sudo python setup.py install
Finally, I copied Robert Nelson’s Boot Overlay program onto my PB:
git clone https://github.com/beagleboard/bb.org-overlays
I’ll use this later to create device tree files for the pHAT DAC and the TFT LCD screen.
Mopidy: Installation
In order to stream music services to the PocketBeagle, I used Mopidy, a python music server. Mopidy is a great program for this project. It’s open source and its documentation is very extensive. In addition, Mopidy allows users to install "extensions" written by other members of the Mopidy community to add features to the standard build. I used the
Spotify
, Mopify, Touchscreen, and EvtDev extensions in this project
First, I needed to install Mopidy’s core. To do this, I used the following lines of terminal code:
wget -q -O - https://apt.mopidy.com/mopidy.gpg | sudo apt-key add –

sudo wget -q -O /etc/apt/sources.list.d/mopidy.list https://apt.mopidy.com/stretch.list

sudo apt-get update

sudo apt-get install mopidy

sudo apt-get install pulseaudio
This code will add Mopidy’s GPG key and APT repo to my package sources in addition to installing Mopidy and all its dependencies. Once Mopidy’s core is installed, I can start downloading extensions. First off, I installed Mopidy’s Spotify and Mopify extensions. Mopidy-Spotify allows Mopidy to stream music from Spotify, and Mopidy-Mopify builds the HTTP pages that I will use to control the Mopidy music server. Here is the installation terminal code:
sudo apt-get install mopidy-spotify

sudo pip install Mopidy-Mopify
Next up, Touchscreen and EvtDev extensions. These two extensions are additional Mopidy frontends. The Touchscreen extension will display display track info on the TFT LCD screen using Game/SDL, and the EvtDev extension will allow us to use the Ipod’s clickwheel to change and pause tracks in Mopidy.
Supposedly
. First, I installed Mopidy-Touchscreen, Pygame, and Pygame’s many many dependencies:
sudo apt-get install git python-dev python-numpy python-opengl libsdl-image1.2-dev libsdl-mixer1.2-dev libsdl-ttf2.0-dev libsmpeg-dev libsdl1.2-dev libportmidi-dev libswscale-dev libavformat-dev libavcodec-dev libtiff5-dev libx11-6 libx11-dev fluid-soundfont-gm timgm6mb-soundfont xfonts-base xfonts-100dpi xfonts-75dpi xfonts-cyrillic fontconfig fonts-freefont-ttf libfreetype6-dev

git clone git@github.com:pygame/pygame.git

cd pygamepython setup.py build

sudo python setup.py install

pip install Mopidy-Touchscreen
Next up, EvtDev:
pip install Mopidy-EvtDev
I will admit that EvtDev is a Mopidy extension that I do not know very much about. My original plan was to use this extension with my backwards engineered Ipod clickwheel to control tracks in Mopidy. While this project still isn’t at the Ipod clickwheel stage, I went ahead and got it anyways. However, I received the following error message trying to install it:
cmportError: <module 'setuptools.dist' from '/usr/local/lib/python2.7/dist-packages/distribute-0.6.45-py2.7.egg/setuptools/dist.pyc'> has no 'check_specifier' attribute
I managed to resolve this error by uninstalling python’s distribute package and updating my setuptools package:
sudo pip uninstall distribute

sudo pip install setuptools
However, I am worried that this broke the install of the EvtDev extension. Whenever I ran Mopidy, I recieved another error code:
AttributeError: When using gi.repository you must not import static modules like "gobject". Please change all occurrences of "import gobject" to "from gi.repository import GObject". See: https://bugzilla.gnome.org/show_bug.cgi?id=709183
Unfortunately, I haven’t been able to spend time to decode and fix this error code yet. Consider this Mopidy extension
optional
.
Mopidy: Configuration
Now that I have Mopidy installed, I need to configure it properly. The mopidy configuration file lives in
/home/debian/.config/mopidy/mopidy.conf
. Each extension will have its own configuration setting to change. I have placed my
mopidy.config
file in my Github as an example. Of special note, for Mopidy-Spotify I needed to get my Spotify Device Username and Password and authorize Mopidy to run on the PB. For more info take a look at these links:
Device Tree: pHAT DAC
Now that we have Mopidy configured and ready to go, I need to make sure that my PocketBeagle can output sound. To do this, I created a device tree for the pHAT DAC. The pHAT DAC uses a Texas Instrument’s pcm5102a sound chip in a 3-wire configuration. I used the following resources to help write the device tree file:
- http://processors.wiki.ti.com/index.php/Sitara_Linux_Audio_DAC_Example
- https://patchwork.kernel.org/patch/9089541/
- https://www.mantralabsglobal.com/blogs/how-to-interface-an-i2s-microphone-with-beaglebone-blackbbb/
- https://e2e.ti.com/support/processors/f/791/t/677078?Linux-AM3359-I2S-microphone-configuration
- https://staging.digitalblender.co/blog/2018-01-17-building-a-device-tree-overlay-for-your-new-pocketcape-design
You can find the device tree file in my Github as the PB-PimorroniPHAT_05.dts file. Once my .dts file was written, I needed to use Robert Neslon’s program to make a .dtbo file. I used the following terminal lines to copy my .dts file into the bb.org-overlay directory, make my .dtbo file, and copy it into
lib/firmware
:
cp PB-PimoroniPHAT_v05.dts bb.org-overlay/src/arm/

cd bb.org-overlay

sudo make

cp src/arm/PB-PimoroniPHAT_v05.dts /lib/firmware
Now that my device tree blob is in the correct directory, I need to enable it in ~/boot/uEnv.txt. To do this I used the nano command line editor to change
#uboot_overlay_addr4=/lib/firmware/<file4>.dtbo
to
uboot_overlay_addr4=/lib/firmware/PB_PimoroniPHAT_v05.dtbo
.
Now all I needed to do was reboot the PocketBeagle and then Linux will recognize the DAC. Unfortunately, this is were my technical problems started to become apparent. No matter what I tried, I could never get the Pimoroni pHAT DAC to load properly. The current device tree blob creates these error messages on boot:
[    1.401744] asoc-simple-card sound: parse error -2

[    1.407250] asoc-simple-card: probe of sound failed with error -2
After doing some digging, I found that the Debian 9.5 IoT Linux build I am using does not contain the drivers needed to recognize the pcm 5102a codec. I am currently trying to compile my own Linux build with the codec drivers included. Yay.
In the meantime, I came up with a work around that I’ll talk about later.
Device Tree: LCD Screen
In order for my Mopidy extensions to use the small LCD screen, I needed to make sure that it was loaded into Linux as a frame buffer device. Thus, I created another device tree file. I used the following resources to help create my .dts file:
- https://gist.github.com/jadonk/1b6a3c17059fe5a1977f3d1e5d12f916
- https://staging.digitalblender.co/blog/2018-01-17-building-a-device-tree-overlay-for-your-new-pocketcape-design
You can find the .dts file in my Github. Next, I used the same process to create the .dtbo as the pHAT DAC device tree. However this time when the PocketBeagle booted up, my device tree worked!
Linux recognizes and loads the TFT LCD Screen properly! However, nothing is really that easy. Upon running Mopidy, the Mopidy-Touchscreen spat out the following error:
error: Unable to open a console terminal
I found that running the
enable_lcd.sh
script from the Github link above helped a little bit, but left me with a white lcd screen and the following error message:
error: Unable to open mouse
I am not familiar with pygame yet to fully understand what these messages mean yet. I’ll most likely end up writing my own Mopidy extension for my LCD screen that doesn’t use pygame. Until them, my Spotify-Pod will just have to be headless.
The Work Around
If you’re like me and can’t wait for a custom linux Kernal to compile to listen to some fiery tracks, don’t worry. I came up with a workaround that doesn’t use the Pimoroni pHAT DAC. To do this, I needed a micro-USB hub, a USB DAC, and the micro-USB breakout board from before. All I needed to do is to plug my USB hub into the PocketBeagle and plug the USB DAC and wifi dongle into the hub. Now Mopidy and pulse audio should automatically recognize the USB DAC and output audio. While this work around does allow the Spotify-Pod to play music as it was envisioned, the USB hub does not fit inside the I-Pod shell. Thus, the current iteration of the device is not in the form factor desired.
Next Steps
I still have quite a way to go on this project, but here are the things I’ll be tackling soon:
- Getting the Pimoroni pHAT DAC to output sound
- Getting Mopidy-Touchscreen to work/Writing my own Mopidy extension
- Backwards engineering a I-Pod clickwheel
Comments are not currently available for this post.