Originally posted by MikroE at https://www.mikroe.com/blog/beagleplay-and-clickid-magic. Shared here with permission.
BeaglePlay® and ClickID Magic!

What is ClickID?
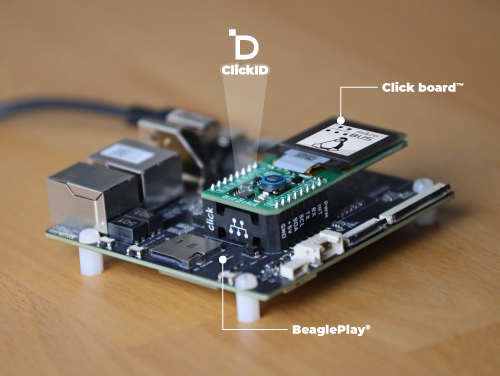
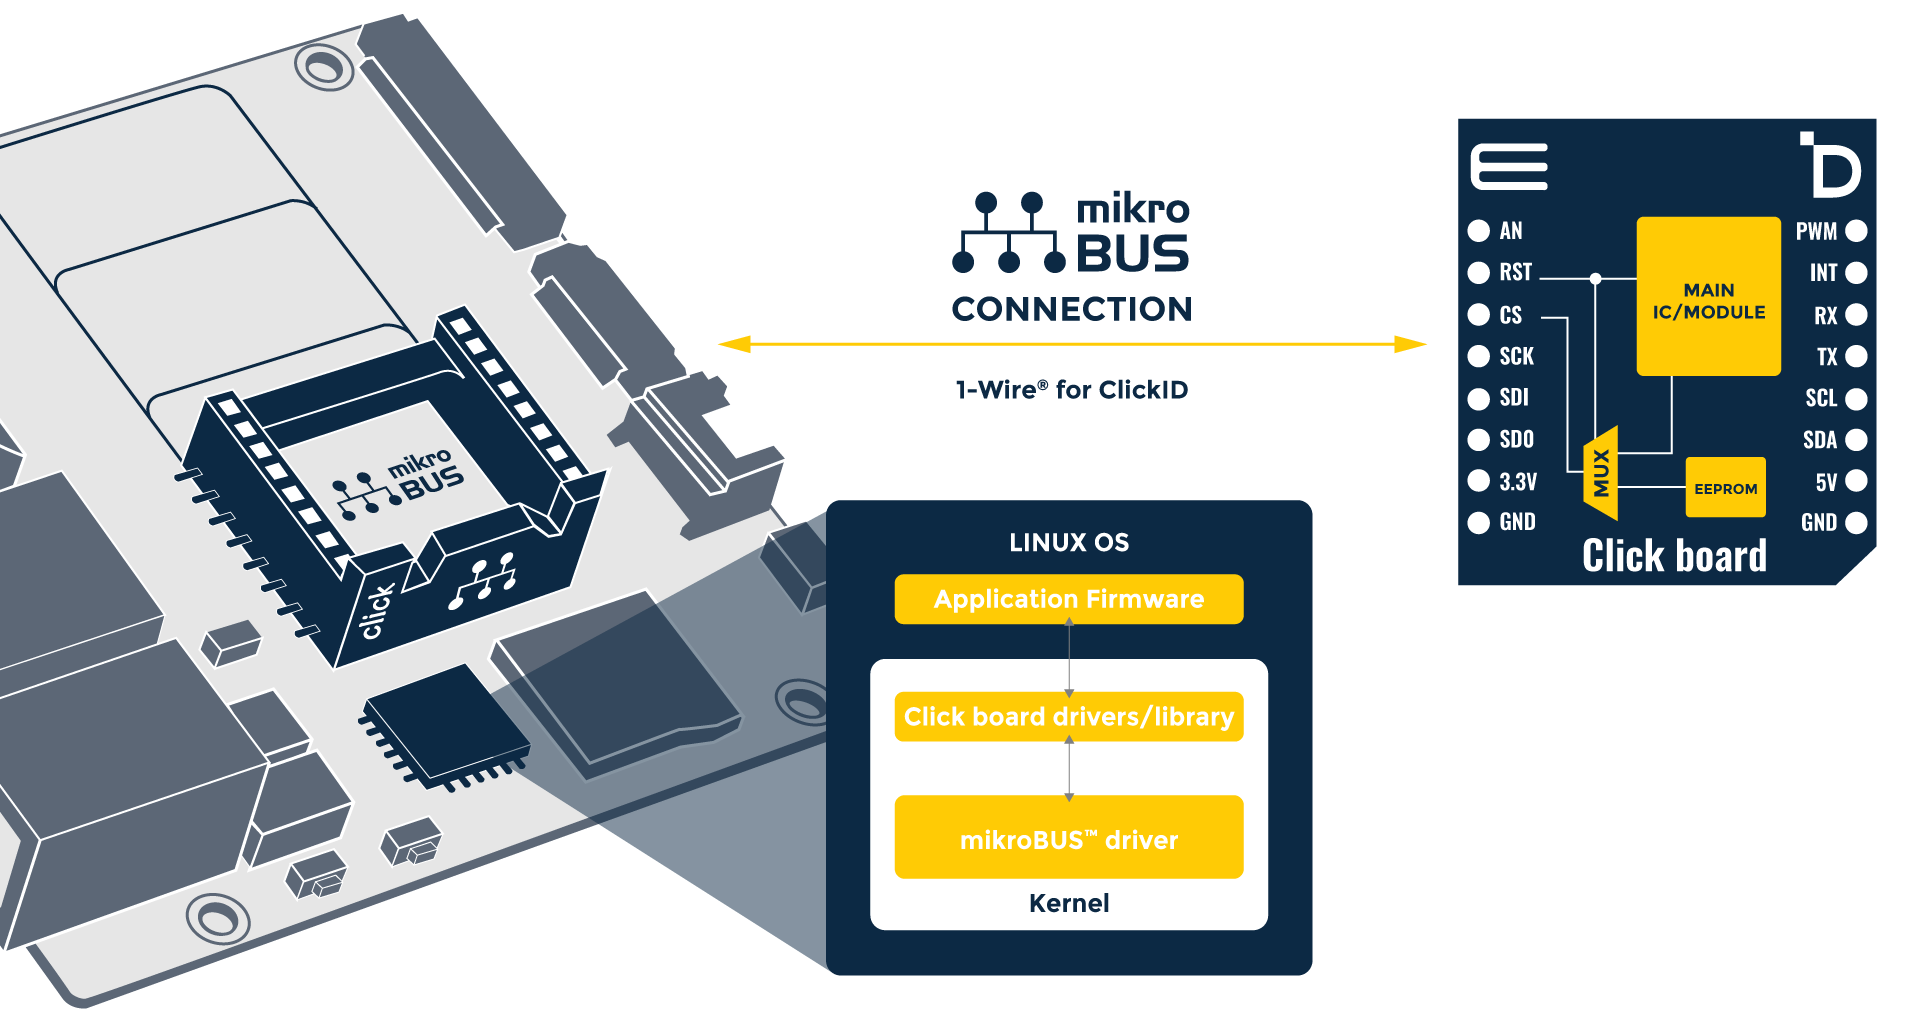
ClickID is a hardware and software solution for mikroBUS™ peripheral identification by any system. All information that you might need about that peripheral is located on the on-board EEPROM chip. Information such as board name, product ID, interfaces used, matching Linux driver, and many others.
The operating system (Linux) communicates with the EEPROM via the 1-Wire protocol, authorizing any sensor/module on the add-on board to be automatically recognized. After that, the manifest will be read by the operating system, and the proper driver is loaded to use some of the following interfaces (SPI, I2C, UART, PWM, ADC) for communication with the target add-on board.
To learn more about this solution, visit our official ClickID landing page.
What is ClickID Manifest?

The ClickID manifest is a descriptor part in the ClickID (EEPROM) memory, which contains the necessary information of a specific board such as pinout, interfaces, or Linux driver for the Click Board™ peripheral. The ClickID manifest is originally derived from the Greybus manifest.
BeagleBoard.org has made a simple open-source Python tool for creating new Click board™ manifests – called Manifesto.
NOTE: In case you have a Click board™ with the ClickID chip, however, without the manifest loaded, don’t worry and just follow the next steps:
Step 1: Selecting the right board and Linux version
When it comes to selecting the right hardware system board and Linux image to start with. Each board has its own Linux image edition – such as BeaglePlay®.
BeaglePlay® is an open-source single-board computer designed to simplify the process of adding sensors, actuators, indicators, human interfaces, and connectivity to a reliable embedded system. It features a powerful 64-bit, quad-core processor and innovative connectivity options, including WiFi, Gigabit Ethernet, sub-GHz wireless, and single-pair Ethernet with power-over-data-line. With compatibility with 1,000s of off-the-shelf Click add-ons and a customized Debian Linux image, BeaglePlay® makes expansion and customization easy.
To kick off your first project, you should first load the appropriate Debian image containing mikroBUS™ and Click board™ drivers on your BeaglePlay® board.

Step 2: Selecting an add-on Click board
The fastest way of utilizing Click add-on boards on BeaglePlay® will be to use some of the existing Click boards™, which already have loaded manifest files. This way, your Debian will be able to identify boards automatically and load appropriate drivers from the Kernel.
However, with 1.500+ Click boards™ in our offer, you would be able to customize your BeaglePlay® infinitely.
All Click boards™ can be used on the BeaglePlay® system; differences among them are:
- Whether they have ClickID hardware support
- Whether they have Linux driver support
- Whether they have both ClickID + Linux driver = manifest support
NOTE: Do not worry; there are still ways to utilize other ClickID/Linux not supported Click boards™. More on that you can find on the BeagleBoard website.
 Weather Click
  Air quality 5 Click
  Accel Click
  OLED C Click
  Environment Click
  Ambient 2 Click
  ETH Click
 LSM6DSL Click
 Thermo K 3 Click
 6DOF IMU 8 Click
  ADC 3 Click
  GNSS 7 Click
 Step 3: Connect all together for a Demo
Materials needed for the setup will be:
- BeaglePlay® board
- microSD card
- USB-C cable for power and data stream
- One unit of the manifest-supported Click board™ (for example, OLED C Click)
1. Download the appropriate Debian image and load it on the microSD card.
2. Insert your microSD card and hold down the “USR” button without applying power.
3. Connect OLED C Click or any other Click board™, coming with loaded manifest, to the board while BeaglePlay® is powered OFF and then apply power.
4. Open BeaglePlay® Linux Terminal.
- Once booted, the Beagle shows up as a USB-Serial Adapter!
- Find it’s IP address on your router and use an “SSH” client to connect
- Connect a monitor, keyboard, and mouse
- Visualize data
SEE IT FOR YOURSELF
With this learn article, and by utilizing the HW setup previously mentioned in this article (Click board with ClickID and BeaglePlay with DebiasOS), you can automate SW processes for your embedded project via the “ClickID” peripheral identification feature!
We already have a huge list of Click boards™ that feature ClickID. You can find them in our shop, purchase them and embark on a journey of discovery, trying out their functionality to find the perfect fit for your specific needs.
Your MIKROE