Categories: Beginner
Hello,
First off, thank you for reading further if you are interested in Beagleboard.org, the Replicape, and 3D Printing in general.
…
I had an older controller and I wanted to upgrade my controller on my 3D Printer. I wanted to convert the PrintrBoard Rev. D to a BBB and Replicape combination. So, I have been working to further my understanding of schematics, wiring diagrams, and the nitty-gritty (the actual manpower and work or time put in).
…
So, I started out and it led me to this site to promote my findings:
https://wiki.thing-printer.com/index.php?title=Replicape_rev_B.
First, as some of you already know, do not take apart your PrintrBot Metal Simple 1403 along the Y-Axis. There will be complications with your stepper motor. If it is the original stepper from 2011, only one side is tapped. So, if you were to take apart the Y-Axis, the issue would be that the motor, which is held together by a sticker, would most likely come apart.
…
I found this out! Although, this was a small setback, I continued to "thrive."
…
I found out that if I was to try to screw the motor together correctly, the entry of the machine screws from the opposite end would end up just floating in the stepper motor. Although this setback let me think of new ways to conjure up ideas, it was a pain.
So, I came up w/ an idea. Purchase a new stepper was a ‘cure’ in the end.

Now…
…
Also, after putting your PrintrBot 1403 back together and after it has been assembled, we can test specific parts to the machine w/ ReFactor on OctoPrint and w/ the BeagleBone Black w/ RepliCape. Oh and the people at RepliCape have been promoting a new board (an all in one 3D Printer board or CNC controller).
This photo is from
https://www.klipper3d.org/G-Codes.html.
Enjoy. First home your device with G28. So, you can use G28 X or you can use G28 Y or both or all three like G28 XYZ. Then, you can move your X-axis to a desired position with G1 X 33 or whatever G1 X <numerical value> you choose. <numerical value> is usually a position argument for where you would like your X-axis located. It gets a lot more complicated but you can see here the ease of use with specific G-Code commands in the terminal on OctoPrint using Klipper with the BBB and the RepliCape.
…
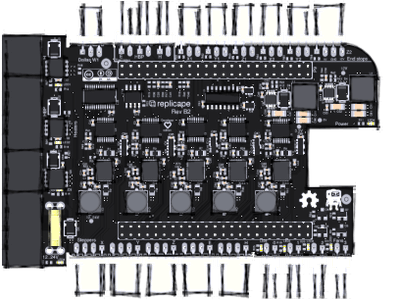
http://wiki.thing-printer.com/index.php?title=Replicape_rev_B#Fritzing_example
is where I got the above wiring diagram for the Replicape.
The diagram works with Fritzing still!
Enjoy…
Also, I have listed some photos below for your viewing pleasure. Please remember that this is a work in progress. It is not a finished work just yet.
…
Oh yea, the photos:
…
…
Okay. So, it seems that the Redeem developers took a hiatus for a bit or for life. Either way, we thank them for their support and now we are on to Klipper with the BBB and the Replicape. You can find more about this fact in the Replicape Slack or Discord channel online or via a Windows/Linux App for Slack.
…
People are already making progress with the Klipper source and the new image for Ubuntu/Debian.
Seth
P.S. If you get bored and you like the Replicape, do not hesitate to join in on the discussion on discord, get involved with the Klipper source, and/or show off some nice prints.
Okay…so!
A machine introduction is due. I will be posting a video soon of some basic commands in G-Code while introducing a relic of a 3D Printer…w/ Klipper source and a GUI called OctoPrint!
Comments are not currently available for this post.