Categories: Beginner
We all use light switches. It is the only way to turn off and on a light in a room. For those with a busy schedule, sometimes lights forget to be turned off when leaving a room. While there are motion sensor based lighting systems on the market, they are relatively expensive. What if you could create your own motion-activated lighting sequence at home? Well now you can! Using a simple PocketBeagle development board, servo motor, and PIR motion sensor, you can set up your own home-based lighting system that turns on the light when it senses motion, such as entering a room, and switches off the light when there is no motion sensed after a certain period.
Step 1: Sodering the PocketBeagle

Step 2: Connecting the servo and PIR motion sensor to the PocketBeagle
Servo:
1. Connect the red wire on the servo to the 5V power rail connected to Vout on the PocketBeagle
2. Connect the black wire of the servo to the ground power rail on the breadboard
3. Connect the yellow wire to a PWM pin on the PocketBeagle (P2_1)
PIR Motion Sensor:
1. Connect the ground pin on the PIR motion sensor to the ground power rail on the breadboard
2. Connect the VCC pin to the 5V power rail connected to Vout on the PocketBeagle
3. Connect the Out pin to a GPIO pin on the Pocketbeagle (P2_4)
Step3: Downloading the Servo Control Code
Prior to completing the remaining steps, make sure to connect your Pocketbeagle to a CPU using a USB type A to micro USB port.
Downloading
the
Adafruit_BBIOLibrary
1. Open Cloud9 by entering
192.168.7.2:3000
on your address bar
2. Connect your Pocketbeagle to the internet via a USB connection:
http://ofitselfso.com/BeagleNotes/HowToConnectBeagleboneBlackToTheInternetViaUSB.php
3. Install the Adafruit_BBIO library by typing the commands from the link below into the Cloud9 Bash interface
https://learn.adafruit.com/setting-up-io-python-library-on-beaglebone-black/installation-on-ubuntu
Step 4: Copying the Servo Control Code Onto the PocketBeagle
1. Download the servo control code attached to this project
2. Drag and drop the python code into a folder within the Cloud9 Interface
Step 5: Running the Servo Control Code
1. Type ‘ls’ into the bash command window to see the contents of your current directory
2. If the servo control code is not in the current directory use the command ‘cd’ along with the directory pathway for the folder you imported the servo control code into. In my case I would type "cd /ENGI_301_Final_Project/" based on the figure above
3. Type ‘ls’ again into the bash command window to make sure the servo control code is within your current directory
4. To run the code, type "sudo python Servo_Control.py" in the bash terminal to start the code
5. You should see the following messages below and your Servo begin to move if your code runs successfully
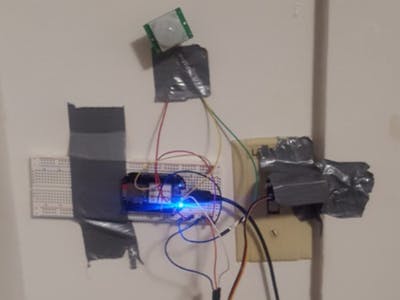
Step 6: Assembling the Light Switch
After setting up the PocketBeagle and running the code to check that the servo motor works with the PIR sensor, we need to extend the linear motor attachment of the Servo. This is done by attaching half of a Popsicle stick to it to allow the motor to hit the switch properly.
Attaching
the
Setup
to
the
Wall
1. Use command strips or other adhesives to attach the Servo and breadboard to the wall
2. Make sure to attach the servo right next tot he light switch so that the motor attachment lies directly above the light switch when the light is on.
Further
Improvements
This project can be further improved by addition of a microphone. By being able to say "OFF" or "ON" to turn the lights on / off will be a cool addition to the project decreasing the need to move to keep the lights on. Additionally a keep on feature could be implemented to keep the Servo in the "ON" position for a desired amount of time after the light switch is flipped. A mechanical assembly to hold the servo in place could also be developed.
Demonstration
A demonstration of the entire setup turning on and off a regular light switch can be found in the attachments to this project.
Comments are not currently available for this post.