Categories: Beginner
Motivation:
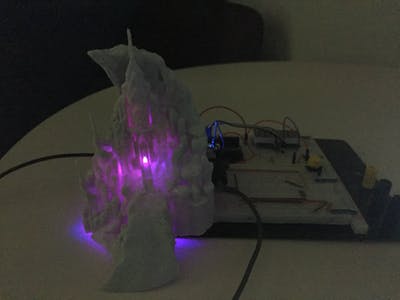
Have 3D-printed/laser cut lamp casing but tired of boring yellow light? Here’s your chance to customize the pattern and color of your own bed-side lamp. What’s more, the lights also dance based on whatever music you choose to play. The program also has a timeout system implemented so you don’t have to remember turning it off.
Overview:
After preparing the music (sorry you have to change the music in the code), the “lamp” prompts you to select a playing mode (1 for blinking frequently or 2 for blinking every now and then) and a shutdown time. The blinking frequency is also associated with the music through very basic frequency analysis. Then the “lamp” plays the music and blinks red, green and blue LEDs at the same time until the determined shutdown time or you manually stop the program.
ElectronicHardware:
The main electronic hardware components are a
PocketBeagle
processor, a
USB micro-B Breakout Board
for connection and a
Pluggable USB Audio Adapter
for playing the music. External male headers were soldered to PocketBeagle and connected to the bread board, leaving female headers up and exposed for easier connection to other components. Jumper wires are used to connect the resistors and the LEDs.
Electronic Wiring:
The fritzing diagram for the project is shown below.

How It Works:
1. Share the internet between your PocketBeagle and your computer.
2. Install these packages just in case you do not have them already installed.
a. sudo apt-get install python-pyaudio python3-pyaudio
b. sudo pip install pyserial
c. sudo apt-get install python-libxml2 python-matplotlib python-numpy ipython python-scipy python-tk
3. OpenCloud 9 and put the code and your music in the same folder, change the name of the music in the code to match with your own music.
4. Run the code from Cloud 9.
5. Enter the parameters following the prompt.
6. Enjoy your light show!
Future Improvements:
These might be something that you could improve on if you are interested:
1. Have the music be one of the inputs from the user.
2. Add more modes through different frequency analysis tools.
3. Use PWMs instead of GPIOs for light intensity variations.
Useful Links:
Thank you for reading all this!!
Comments are not currently available for this post.