Categories: Intermediate
The Use
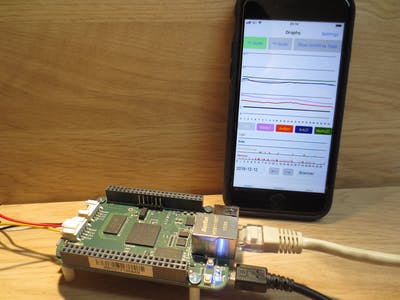
I want to monitor temperature values of different places and on/off states of different equipment in our house and want to store the aquired sensor data in the cloud. I want to view the data in table form and graphically on PC and iPhone.
MicrosoftAzure Storage Tables service proved to be a well suited tool for cloud storage.
- When not too many data are transferred to the Cloud the service is cheap (usually less than 10 cents/month).
- Http or https transport can be used.
- There are measures to ensure data integrity by design.
- Libraries are provided by Microsoft to use the service with different programming languages and on different hardware platforms.
The created Cloud tables can be displayed in table form with the free tool
Microsoft Azure Storage Explorer
on Windows, Linux or Mac or on iOS-devices with the App
AzureTabStorClient
To achieve a more comprehensive visualization of the distribution, changes and possible dependencies of data over a day I wanted to display a number of analog graphs and on/off graphs on one screen. I arbitrarily decided to show 4 analog graphs and 4 on/off graphs on one screen. To access the graphs quickly and from everywhere I made an iOS App (
Charts4Azure).
The use of an App required the data to be stored in a special way on Azure tables. This will be described later in detail.
As I like the ease of creating and debugging projects in C# with Visual Studio (VS) I took the way of installing Mono on the Beaglebone and using remote debugging with VS 2017.
Set up the Beaglebone
Download Image
Debian9.5 2018-10-07 4GB SD IoT
from here:
http://beagleboard.org/latest-images
Write the Debian Image to the SD-Card as described here:
https://staging.digitalblender.co/getting-started#update
Change Beaglebone Credentials
After booting the Beaglebone from the SD-Card you can log in through the automatically created virtual port (see Device Manager) via a terminal emulator like ‘Tera Term’.Log in with the default credentials User-Name:
debian
, Password:
temppwd
.
Now you can assign a root password:
debian@beaglebone:$sudo passwd root
you are asked for your debian password (temppwd).
After entering the debian password you can assign the root password which can be used after rebooting the board. Now you should change your debian password:
debian@beaglebone:$sudo passwd debian
Get Network- and Internetconnection
Set up a network and internet connection to install needed library packages as described on this site:
https://www.ofitselfso.com/Beagle/NetworkingSetupConnectingTheBeagleboneBlack.php
If the Beaglebone doesn’t get a valid IP-Address from your DHCP server, try to reset the board by pressing the reset button after it once has booted after powering up. Evtl. log in to the Webserver of your router to see if your Beaglebone got assigned an IP-Address.
Now you should be able to successfully ping the ip-address
8.8.8.8
from the beaglebone console and to access the beaglebone with ‘Tera Term’ through ssh:
Install Samba on the Beaglebone
(My instructions how to install Samba on theBeaglebone were originally posted by Martin Calsysn (
https://github.com/PervasiveDigital
), unfortunately his post is actually not online, so I cannot give a direct link).
To easily move files back and forth from your PC to the Beaglebone you should install the Samba Server on the Beaglebone:
debian@beaglebone:~$sudo apt-get install samba
If the command doesn’t work, it may be that Samba was not in the Packages List of your Debian distribution.You should then add the following two lines to the file:
/etc/apt/sources.list
deb http://deb.debian.org/debian
stretch main
deb-src
http://deb.debian.org/debian stretch main
Now you should type the command:sudo apt-get update
And then again try:
debian@beaglebone:~$sudo apt-get install samba
After the successful installation of Samba:
Set a password for the default user ‘debian’ (change ‘debian’ if you have created and are using a different user for your development). Samba uses its own password database. Users must first exist in /etc/passwd, and then you can add them to the samba system with smbpasswd -a:
debian@beaglebone:~$sudo smbpasswd -a debian
Now edit the Samba configuration file with:
debian@beaglebone:~$sudo nano /etc/samba/smb.conf
Normally, access to your home directory will be read-only, but we want to be able to write to the home directory. So change read only = yes to read only = no
[homes]
comment = Home Directories
browseable = no
# By default, the home directories are exported read-only. Change the
# next parameter to ‘no’ if you want to be able to write to them.
read only = no
Save the file with Ctrl-o and Ctrl-x
Restart the samba server:
debian@beaglebone:~$ sudo /usr/sbin/service smbd
restart
Now mount the newly created share on your Windows PC.
Type in the Windows PowerShell:
C:\>net use * \\beaglebone\debian /user:debian *
Type the password for \\beaglebone\debian:
Drive Z: is now connected to \\beaglebone\debian.
The command completed successfully.
To remove a mounted drive from the Windows system, use this command:
C:\>net use z: /d
z: was deleted successfully.
Now you should be able to access the file system of Beaglebone user debian with your Windows Explorer.
Install Mono on the Beaglebone
For more information about Mono on the Beaglebone consult:
https://www.ofitselfso.com/Beagle/Beagle.php
To install Mono type the following commands:
sudo apt-get update
sudo apt-get install
build-essential automake checkinstall intltool libtool git
sudo apt-get install
mono-complete
It will last some time….
You can ensure that the programs are installed correctly:
mono –version
mcs –version
Install MonoRemoteDebugger.Server on the Beaglebone
Download the MonoRemoteDebugger.Server.
Be sure that you have navigated into the home directory of user Debian (you may not be in the root directory) when downloading the Zip file.
debian@beaglebone:~$ wget
https://github.com/techl/MonoRemoteDebugger/releases/download/v1.3.0/MonoRemoteDebugger.Server.zip
Extract the downloaded file
debian@beaglebone:~$ unzip -d MonoRemoteDebugger.Server MonoRemoteDebugger.Server.zip
Start the remote debugger server:
debian@beaglebone:~$ cd
MonoRemoteDebugger.Server
or
root@beaglebone:/home#cd MonoRemoteDebugger.Server
debian@beaglebone:~/MonoRemoteDebugger.Server$
mono
MonoRemoteDebugger.Server.exe
Note:You must repeat the last step each time you reboot the Linux system, log out, or otherwise stop the remote debugger server.
Create a new folder for your C# solutions for Beaglebone user debian to hold your C# applications on the Beaglebone. I created a folder named ‘C#Progs’.
I will use this foldername from now on in this tutorial.
debian@beaglebone:~$mkdir C#Progs
Set up your PC
InstallVisual Studio 2017 Community Edition
https://visualstudio.microsoft.com/de/downloads/
Make sure that Linux Development with C++ is selected on your Visual Studio installation.

Then install the MonoRemoteDebugger Extension
https://marketplace.visualstudio.com/items?itemName=Bongho.MonoRemoteDebugger
Now you can create a new Solution in Visual Studio with the project folder located on the Beaglebone.
Run Visual Studio to debug the code.
Toolbar -> MonoRemoteDebugger -> Debug with Mono(remote)
Type remote IP Address.e, g. 192.168.1.46 (IP of your Beaglebone).
Click Connect button.
Then the program will run and hit the breakpoint which you set on Visual Studio.
Now you are ready to install the application which writes to Azure Tables.
If you do not have an Azure Account, you first have to
Create an AzureStorage Account
Follow the instructions at
https://docs.microsoft.com/en-us/azure/storage/common/storage-quickstart-create-account?tabs=portal
Don’t forget to remember the name of your Account and to retrieve the Key of your account from the Azure Portal. You will need them in the next step.
Install theAzureDataSender_Beaglebone Application
Go to:
https://github.com/RoSchmi/AzureDataSender_Beaglebone
download and extract the Zip file to the C#Progs folder on theBeaglebone.
Open the project file ‘AzureDataSender_Beaglebone.sln’ in Visual Studio.
If you already have an Azure Storage Account you can go into the code of the application to set in your Azure Storage Account name and the key.
//****************** Settings to be changed by user ********************

static string storageAccount = "youraccountname";

static string storageKey = "mkswej..your...key...lka7edslmd";
After that you can start MonoRemoteDebugger -> Debug with Mono (remote) and the app should run, create the needed Azure tables and begin to write test-data to the Cloud.
Have a look on the directive #define UseTestValues.
If the #define is active automatically created test-values are periodically written to the Cloud. If the #define is outcommented the App should write the signals at the analog inputs AIN0 to AIN3 to the Cloud every 10 minutes.
Press and release the USER button of the Beaglebone and a new row in the corresponding cloud table should be written (pull up resistor needed).Use the free tool
Microsoft Azure Storage Explorer
to view the tables on your Azure Account.Use the App
Charts4Azure
which is available through this
link to the App Store
to visualize your data graphically.
Important Information!!!
Be careful with the analog inputs of the Beaglebone! Never apply a higher voltage than 1.8 Volts !! Higher voltages will kill the board.
Pitfalls
During booting Beagelbone green by default uses u-boot from the eMMC. If this u-boot version is too old the file ‘uEnv.txt’ is not correctly processed and AIN ports cannot be accessed. To boot with the u-boot version from the SD-Card press the User Button when powering up. Alternatively write the content of the SD-Card to the eMMC (how to is explained elsewhere). When doing so, make a copy of your SD-Card before. It may be that you cannot boot from the SD-Card any more.
C# Wrapper Classes for Beaglebone
I found two websites showing wrapper classes to access Beaglebone ports from C#.
https://github.com/Digithought/BlackNet
and
https://www.ofitselfso.com/BBBCSIO/BBBCSIO.php
In this project I used the classes from the Digithought site and made some minor supplements e.g. to blink the user Leds (see Code)
How the Beaglebone Application Works
To store the sensor data to the Cloud ‘WindowsAzure.Storage’ library is used. The library is added to the project as a Nuget package.
- Analog values:
The application uses one table to store the readings of 4 analog inputs of the Beaglebone. When the timer ‘writeAnalogToCloudTimer’ ticks, the program gets 4 analog values from the ‘
DataContainer’
and writes them to the Cloud. When the timer ‘getSensorDataTimer’ ticks 4 analog values are read from the analog inputs and written to the ‘
DataContainer
‘. The values are stored with a timestamp. When the data are read from the Datacontainer and they are to old (invalidateInterval) not the old value but 999.9 (means: not valid) is returned. - On/off values:
The application uses 4 tables to store the states of 4 digital (On/Off) inputs. Every time the state changes, a new row with the following information is sent to the Cloud:
‘
ActStatus’, ‘LastStatus’,
‘
SampleTime’, ‘TimeFromLast’, ‘OnTimeDay’.
For each on/off-input an instance of the class ‘OnOffDigitalSensorMgr’ is created. The parameters of the constructor define the name of the cloud table and other things (see code). When the ‘input’ property of an instance of the class is toggled, a new table row is sent to the Cloud. The boolean value written to the ‘input’ needs not to come necessarily from a physical GPIO but may come from any code writing to the ‘input’. To read from the physical Beaglebone GPIOs, each used (up to 4) GPIO gets an instance of the Class ‘BeagleGpioReader’. In each of these instances runs a thread which permanently polls the GPIO and throws an event when the GPIO input changes its state (‘BeagleGpioReader_0x_gpioStateChanged’). In this eventhandler the state of the GPIO is written to the ‘input’ of the ‘OnOffDigitalSensorMgr’ class. - Settings to be changed by user:
Here you can enter and change the credentials, the names of the tables and properties, your ‘TimeZoneOffset’ and the settings of your region for ‘DaylightSavingTime’. - Some information about analog and digital inputs:
Be careful with the analog inputs of the Beaglebone !! Never apply a voltage higher than 1.8 Volts !! Higher voltages will kill the board.
To use the User Button of the Beaglebone for tests to send table rows to the Cloud you must apply an external pull up resistor of 10 kOhms from 3.3 V to P8_43 (see picture). A pull up resistor is needed for any other GPIO which is used as input as well.
- You can use other analog sensors which for instance are connected through I2C or 1-wire bus. Examples can be found here on Hackster or elsewhere in the net. You only need to modify the method ‘ReadAnalogSensor’ to return the value of your sensor. The same applies to the digital inputs. Just write some code (preferably an event handler) that sets the input property of ‘OnOffDigitalSensorMgr’ to true or false.
- Limitations for analog values:
The analog values have to be in the range from -40.0 to 140.0. Values outside this range are set to -40.0 or 140.0 respectively. The value of 999.9 is taken as ‘invalid value’. If you use temperature values they should be entered as Degree Celsius. The App ‘Charts4Azure’ can transfer and display these values in the Fahrenheit scale (not vice versa). - Some peculiarities of the Application
All tablenames get the actual year as a suffix.
So, for example, if you name your table ‘AnalogTable’, an Azure Storage table with the name ‘AnalogTable2018’ will be created. In the next year it will automatically switch to ‘AnalogTable2019’.
So the tables don’t get too large and old tables can easily be deleted without affecting actual tables.Concerning the On/Off tables is the ‘particularity’ that 30 sec before midnight the application always sends a row with an ‘off’ message, independent of the real state of the sensor. This is because the iOS App for the graphical visualization shows always the course of one day and uses the ‘going off edge’ to calculate the ‘On’ time.
This is no ideal solution but I didn’t yet have the idea of a better one.The analog values sent to the Cloud are limited to the range -40.0 to 140.0. Not valid analog values are (have to be) expressed as 999.9. These particularities are needed to achieve that the data are correctly displayed by the iOS App.
- More things to tell:
This was a lot to tell, but I’m sure that I forgot some important things and many things could have been made better and in another way. Feel free to ask in the case of ambiguities or if you have proposals to improve this application. This project is considered to be work in progress.
Comments are not currently available for this post.