Categories: Intermediate
Motivation
Do you know how to play an instrument? Well, I sure do not. Since I was in middle school, I always wanted to learn how to play an instrument and how to read music. Music theory was something I Unfortunately, I never got the opportunity to do so. As a senior in college, I decided it’s time for that to change. I combined my interest in music and my love for electronics into a Laser Harp Controller that allows one to play a mixture of the notes in an octave by simply waving their hand between the lasers!
Software
To use the PocketBeagle, I needed to install Linux on an SD card. For this project, I downloaded the bone-debian-9.5-iot-armhf-2018-10-07-4gb.img.xz file from BeagleBoard.org. I then flashed my SD card with this file. Finally, I connected my PocketBEagle to the internet to allow more effective integration. The following sources provide good tutorials on how to flash and connect to the internet.
Flash SD Card:
https://staging.digitalblender.co/getting-started#update
Connect to Internet:
https://staging.digitalblender.co/blog/2016-10-19-%E2%80%8Bhow-to-connect-a-beaglebone-black-to-the-internet-using-usb
For this project, I also needed to load Python and several libraries including Adafruit’s BBIO Python Library and the Threading library. To make sure you have python installed do the following in a terminal:
sudo apt-get update

sudo apt-get install build-essential python-dev python-setuptools python-pip python-smbus -y
Next, install the Python package manager:
sudo apt-get install python-pip

sudo apt-get install python3-pip
Now install the Adafruit BBIO library:
sudo pip install Adafruit_BBIO
The threading library is already in the standard library so there is no need to manually install it.
All necessary code is within the LaserHarp_main.py file included below.
Schematics,Wiring

STEMMA Speaker Connections:
PWM –> P2_3
GND –> GND
Laser Diode Connections:
VCC –> 5 V
GND –> GND
Photoresistor (LDR) Connections:
VCC –> 5 V *Limited to 1.8V using voltage divider
AIN0 –> P1_19
AIN1 –> P1_21
AIN2 –> P1_23
AIN3 –> P1_25
AIN4 –> P1_27
AIN5 –> P2_35
AIN6 –> P1_2
AIN7 –> P2_36
GND –> GND
Electronics,
Hardware
There are four main electronic components: a Pocketbeagle, laser diodes (x8), photoresisters (x8), and a speaker. The speaker is connected to PWM pins and take in signals at 50 % duty and a note-specific frequency. The laser diodes are connected to the 5V pins from the SYS VOUT of the pocketbeagle. The photoresistors take in a voltage signal from the output of a voltage divider (R2 = 2.2K Ω, R1 = 1K Ω) applied to the SYS VOUT. The output of the photoresistors are passed as analog inputs (AIN) into the PocketBeagle. As shown in the Fritzing diagram, three separate breadboards along with jumper wires are used for improved functionality.
Build
Instructions
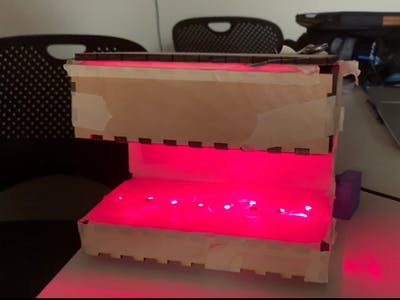
The snap-fit build enclosure for the Laser Harp Controller consist of two 7” x 7” x 2” boxes rested on top of each other using a middle thin plank. The back and bottom pieces were left open for ease of access to electrical components. The entire build was cut out of 5.1 mm plywood using and Epilog Fusion Laser Cutter. Tape was used to better secure the snap-fit edges. The Adobe Illustrator files used to cut the necessary pieces are attached below.
Assemble the two boxes separately, but do not attached the back or bottom pieces. As shown in the figure below.
Use the the 1” x 7” piece to connect the boxes together along with as much tape as necessary. Using the holes as guides, place the laser diodes in holes of the top full box and place the photoresistors in the holes of the bottom step box.
Finally, Place the speaker on top and input breadboards inside build.
Operation
Instructions
1) Wire up components following Fritzing diagram and pin connections
2) Plug in PocketBeagle to computer
3) Run the LaserHarp_main.py code (provided below)
4) Place under desired laser(s)
5) Listen to beautiful notes!
Limitations
1) There is ~0.5 s lag between blocking the laser and the output of the sound.
2) Currently, it is very hard to differentiate the sounds when trying to block multiple lasers at once. This is most likely due to the low-quality speaker
3) Large variance in photoresistor responses to light
Future
Improvements
1) Improved device enclosure
2) Higher quality speaker and laser diodes
3) Instead of playing specific notes try playing different songs/tunes
4) Use a more advanced tone/note library
Useful
Links
Adafruit BBIO Library:
https://learn.adafruit.com/setting-up-io-python-library-on-beaglebone-black/using-the-bbio-library
Note Library:
https://www.arduino.cc/en/Tutorial/ToneMelody?from=Tutorial.Tone
Comments are not currently available for this post.