Categories: Beginner
Motivation:
Have you ever really had fun just pulling candy out of a bag? I haven’t. Instead, I would sometimes come up with games to make eating my candy more fun. I would eat different colors in groups, try to toss Skittles into my mouth, etc. This motivated me to build a dispenser that would make eating Skittles more enjoyable. I combined the fun of using automated machines with my favorite game series The Legend of Zelda to create this device. It automatically activates when you place your hand in the beam and plays a Zelda song while it dispenses! I personally use it for dispensing Skittles, but it can be used for candies of similar size or easily adapted to other candies.
Overview:
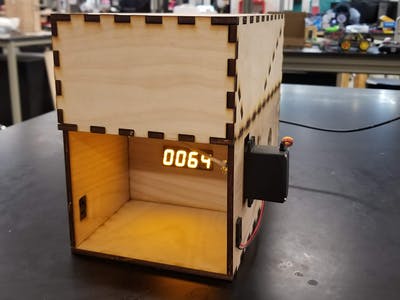
This candy dispenser activates when you place your hand underneath the dispensing slot and break the IR beam. When you break the beam, it will play a song from The Legend of Zelda. When the song finishes and you are now happy from having listened to the song, it will make you even happier when the servo turns and gives you candy! While all of this is going on, a force sensitive resistor inside the candy storage chamber will take weight measurements that will be converted to "fill percentage." This "fill percentage" will then be displayed on a hex display in the dispensing area. The dispenser can play every song that can be played on the ocarina in The Legend of Zelda: Ocarina of Time.

Electronics, Hardware:
There are six main electronics hardware components: a
Pocketbeagle
, an
IR breakbeam sensor
, a
Force Sensitive Resistor
, a
standard servo
, a
piezo element
, and an
i2c backpack hex display
. The piezo element and servo are connected to pwm pins and take signals for sound and movement respectively. The Force Sensitive Resistor is connected to an analog input pin and reads force as an input from 0 to 1. The IR breakbeam sensor is connected to a GPIO and reads a 0 for broken and 1 for connected. The i2c backpack hex display is connected to a GPIO set to out. The components are connected to the Pocketbeagle using jumper wires for ease of use.
Electronics, Wiring:
The fritzing diagram for the candy dispenser is shown below:
Servo Connections:
PWM –> P2_1
GND –> GND
VCC –> 5V
IR Transmitter Connections:
GND –> GND
VCC –> 3.3V
IR Receiver Connections:
SIG –> P2_2
GND –> GND
VCC –> 3.3V
Note:
10k Ohm pull up to 3.3V for SIG
Force Sensitive Resistor Connections:
Output –> P2_35
VCC –> 3.3V
Note:
15k Ohm pull down to ground for output
Piezo Element Connections:
PWM –> P2_3
GND –> GND
Hex Display Connections:
SCL –> P2_9
SDA –> P2_11
GND –> GND
VCC –> 5V
Note:
10k Ohm pull up to 3.3V for SCL
Note:
10k Ohm pull up to 3.3V for SDA
Device Enclosure:
The device enclosure consists of two halves with one resting on top of the other. There are slots to pass wires through and press fitted slots and holes to place the hardware components. The top candy storage area has two ramps that funnel the candy towards the dispensing slots.
The entire enclosure was cut out of 5.1 mm plywood using a laser cutter. It is all press-fit with no glue used. The Adobe Illustrator files for the enclosure are attached below.
The two thing you will need to make yourself is a hinge mechanism for the dispensing door and a connection mechanism between the dispensing door and the servo. This connector can be made with a rigid object of the proper size and length. In my version, this is done using a skinny dowel.
How It Works:
Step 1: Fill the top with candy (in my case Skittles).
Step 2: Run the shell script (given below) to configure the pins and run the main python script (also given below).
Step 3: Place your hand in the dispensing area to break the IR beam.
Step 4: Listen to a Zelda song play and have a spectacular time.
Step 5: Have the candy dispensed into your hand.
Step 6: Eat your candy while once again having a spectacular time.
Step 7: Refill the candy when the hex display gets close to 0.
Future Improvements:
To improve this project you could:
- Improve the dispensing slot/door.
- Improve the accuracy of the fill percentage measurement.
- Add more songs!
Useful Links:
Using the Adafruit BBIO Library:
https://learn.adafruit.com/setting-up-io-python-library-on-beaglebone-black/using-the-bbio-library
Wiring the IR breakbeam sensors:
https://learn.adafruit.com/ir-breakbeam-sensors/arduino
Wiring the FSR:
https://learn.adafruit.com/force-sensitive-resistor-fsr/using-an-fsr
Wiring the piezo element and piezo element note library:
https://www.arduino.cc/en/Tutorial/ToneMelody?from=Tutorial.Tone
Comments are not currently available for this post.