Categories: Intermediate
Introduction
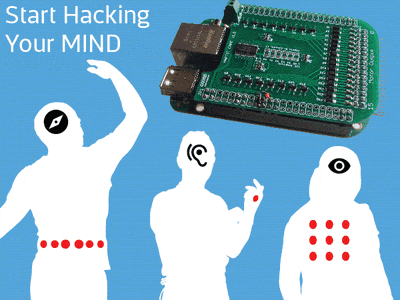
Detecting Earth’s magnetic fields for navigation like a bird, feeling radio waves, having a literal eye on the back of your head. What was once science fiction is now available for experimentation with haptic interfaces. This project aims to walk you through assembling a BeagleBone Green/Black compatible daughter board (The Haptic Cape) and a basic wearable belt that will allow you to easily and quickly experiment with the burgeoning field of sensory prosthetic research.
The study and application of haptics (or kinesthetic communication) take advantage of the human sense of touch to relay information to the user. From the gentle buzzing of your phone, to the feel of a game controller vibrating in your hands, or rumble strips along major highways to alert sleepy motorists, haptics have found useful application in many systems. Despite the variety of these few examples, their unifying concept is that haptic information is quickly internalized and understood by the user even when they are performing difficult or distracting tasks.
Taking this idea a step further, researchers have been working to use similar tools not to alert someone to a phone call but to accomplish things such as:
- Aiding deaf individuals to read lips and discern sounds more accurately.
[1] - Reducing traffic accidents by constantly providing non-visual/non-auditory information to drivers while on the road.
[2]
- Improving the balancing ability of individuals who have suffered from inner ear damage.
[3] - Allow a group to communicate non-verbally without the need for line-of-sight. [
4]
Each of these
haptic neuroprosthesic system
take diverse sensor information and process it into a format that can be used to stimulate a user’s skin via the vibration of an actuator called a
tactor
. Unlike screens or speakers, if presented properly and left on long enough, the sensor data being delivered via these tactors can end up being treated by the brain as another part of the user’s sensory system.
In effect, we’re piggy-backing sensor data into the mind via the oft-ignored sense of touch!
[5]
Over the course of this project we’ll assemble the BeagleBone Haptic Cape, look at one method of creating a generic wearable haptic research interface, and finally try out a few sample applications
based on past studies
that utilize the Seeed Studio’s Grove sensor ecosystem!
Obligatory Beta Warning
Although the information below will guide you to making a successful haptic controller and wearable, consider everything presented as an artifact of work under active development. You’re looking at the result of < 30 days of intense effort and there are still many rough edges to smooth and improvements yet to be made.
Be sure to check this project page for updates as work continues!
Prerequisites
Since this project involves the creation of a BeagleBone Cape and a soft wearable apparatus, it’s advised that you:
- Have some surface mount soldering experience
The components on the Haptic Cape itself are pretty small due to the board’s size restrictions so having a decent amount of familiarity with surface mount soldering is greatly recommended.
If you can handle soldering TSSOP packages and 0603 size passives, you’re good to go. If you can’t, don’t sweat it! Check out the great
SMD soldering tutorial video from EEVBlog
and start learning this useful craft! You’ll thank yourself later.
- Know a little bit about Python
Since that’s the language this Cape currently supports it’d be good to have at least some level of familiarity. Knowing about basic program flow and data structures like dictionaries is recommended.
(Don’t fret though: BoneScript support is in the works too!)
- Be creative!
Even though this project will show you how to build a complete haptic development system, think of it as starting place for your own kinesthetic communication research!
Think outside of the box and push the field into new territory!
Enter the Haptic Cape
At its core, the Haptic Cape is an open source BeagleBone Green/Black compatible daughter board that allows users to quickly develop and test haptic systems. Backed by the BeagleBone’s impressive capabilities and the active BeagleBone community, it aims to get a haptic project up and running with a minimum of potential barriers or development pitfalls.
Currently, the Haptic Cape offers 16 channels of PWM signal generation with 4095 levels of intensity for controlling haptic tactors such as vibrating motors via a separate power supply.
On the software side, a documented python library has been created that provides a simple interface to the Cape’s hardware for quick integration and use.
As shown in the sample projects below, the Haptic Cape library will allow us to create simple haptic systems that take in sensor data and output useful vibrosensory patterns with less than 15 lines of code!
Getting the Cape Fabricated
To get the latest gerbers and Eagle schematic/PCB files, clone the official Haptic Cape project repository by running:
$ git clone https://bitbucket.org/cw_earley/coord-haptic-cape.git
Inside the newly created directory is a zip file containing gerbers generated using
Seeed Studio’s Fusion cam job
file. If you want to use a different fabhouse, open up the .brd file up in Eagle (Free Edition is fine) and use the fabhouse’s cam job file to generate compatible gerbers.
From there follow your fabricator’s instructions on submitting your board and while you wait,
start ordering all the parts
!
(OctoPart Hint: Click the "Buy Now" text to add all the parts to a digikey/mouser cart at once!)
Haptic Cape Assembly
Getting the cape populated and ready to go is pretty straightforward. Once again, this is a board that makes heavy use of surface mount parts so if you’re squeamish about chips with 0.5mm pin pitches and tiny passive that vanish with the slightest of sneezes, just watch helpful tutorials from places like
EEVBlog
or
SparkFun
and
take things slowly!
Note on Board Changes
This is an earlier version of the Haptic Cape than what currently resides on the officlal
Haptic Cape BitBucket repository
. As such there are some small differences and a little rework in these instructions that do not apply to the board currently on bitbucket.
My Soldering Setup
This is where the magic happens. I didn’t list everything I use on the project hardware list since most of it isn’t absolutely vital for this type of work. I asked around and it seems that soldering equipment is a very individual and personal thing, so try stuff out and see what works for you.

Getting the Hard Stuff Out of the Way
As a general rule, I like to start with the hardest things first and work my way towards an easy finish. With respect to PCB assembly, this means starting with the smaller components and progressively getting larger, eventually ending with any through-hole headers and connectors.
The Home Stretch
Now that all the SMD work is finished, all that’s left are male headers and power connectors.
Last step!
Now that you have a complete Haptic Cape ready, lets perform a quick test to make sure everything is up and running.
Board Testing
Plug the cape into your BeagleBone and make sure it’s correctly aligned firmly seated in the headers. After powering on the BeagleBone, open up a Cloud9/SSH instance and clone the official library into an accessible directory with
$ git clone https://bitbucket.org/cw_earley/coord-haptic-cape-python-lib.git
Now cd into the newly created repository directory and run the testing demo that will proceed to pulse every output on the cape.
$ python demo_haptic_pulse.py
If all goes well, you should see just normal debug messages like shown here:
Even though you don’t have anything hooked up to the outputs yet, just confirming that the BeagleBone is communicating with the PCA9685 is good to know before moving on.
What if I get loads of I2C errors!?
Don’t worry! Just double check your solder work with a loupe or a multimeter. This is where no-clean flux can be a lifesaver. Just a little line of the stuff and a quick pass with the iron can sort out lots of detached/bridged pin issues with minimal fuss.
From here, you are more than welcome to continue on to make a haptic belt wearable or choose to
make something simpler
. Although this hackster project documents the creation of a full eight tactor belt, if there’s enough interest a smaller/cheaper setup could be added at a later date. Just let me know in the comments!
Try on the Haptic Belt
Over the course of the last few decades, multiple haptic wearables have been tested and utilized but one stands out for projects related to mobility and sensory augmentation:
What’s best is a belt around the torso with eight tactors signifying the eight cardinal directions.
[4]
Sienko et al. found that 4 tactors spaced evenly around the waist were as effective at [reducing body tilt] as an array of 48 tactors (3 rows by 16 columns) placed around the waist.
[6]
McDaniel et al. developed a tactile belt of 7 equidistantly spaced tactors around the waist to cue a blind user of another person’s presence. Results showed that the belt could convey another person’s direction via vibration location and another person’s distance via vibration duration.
[6]
This 4-8 tactor-laden belt provides a comfortable (although not fashionable) manner of exposing a ring of normally un-stimulated skin around the waist to haptic information without impairing mobility. Depending on the task at hand, fewer than the eight available tactor outputs can be used but for the sake generality this project will outline the fabrication of an eight-tactor haptic wearable as described in the successful Army Research Laboratory study
[4]
and the original
FeelSpace navigation belt
study
that we will be aiming to replicate later as a quick example.
[7]
Haptic Belt Assembly
The Case
Cutting the Tactor Wires
Wire Crimping 101
Since the Haptic Cape uses unshielded 0.100" headers, a common choice for a wire-to-board connector are the
Molex SL
series. These are usually seen in servo connector assemblies or in PC case cables that mate with a motherboard’s exposed pins. I’ve used these numerous times in the past to connect peripherals directly to PCBs with little fuss so they’re greatly recommended for situation where you want flexibility to connect/disconnect cables to a board and don’t want to worry about things disconnecting.
Crimping Equipment and Process
[Optional] DIY Motor Encapsulation (For the Scavengers)
If you buy encapsulated motors similar to the ones listed in the project
Components and Supplies
list you can skip this step.
Since I had already scavenged eight un-encapsulated ERM motors from a collection of retired pagers, I had to protect the shafts myself.
Finishing the Tactor Assemblies
Cutting a Path for the Wires and Setting up the Wrap
Attaching the Tactors
Attaching all the Tactors and Tidying Up
Rolling a Haptic Burrito
Attaching the Case
Putting It All Together
Belt Testing
Just as we did with the Haptic Cape by itself. Just cd into the Haptic Cape library directory you cloned the git repo into earlier and
run the testing demo that will proceed to pulse every output on the cape in sequence.
$ python demo_haptic_pulse.py
If everything is good, you should feel (and hear) each of the outputs vibrate around your waist! Neat!
Getting Up and Running
To get your desired program running on the belt without needing to hook up a USB cable you have two options:
- Add the script to the root crontab so it runs at boot.
Just run
$ sudo crontab -e
and add a @reboot job as shown below (adjusted to match your script location) to the bottom of the file
@reboot python /path/to/your/script.py &
And save! When you next restart, that script will run right after booting up.
The second method requires your BeagleBone to have a working WiFi dongle and home wireless network but it’s very useful for active development since you can keep the belt on while you code:
- Navigate to your BeagleBone’s Cloud9 interface from another PC on your network or SSH into it.
Pretty self-explanatory. If you know the local IP address your network gives the BeagleBone, you can SSH for direct console access or just open a browser and go to http://[BeagleBoneIP]:3000/ide.html and have wireless access to the Cloud9 IDE running on the hardware. When I was developing the library and demos covered a bit lower, this workflow was the most natural. I could make changes to a script and rerun it without needing to even touch the belt.
Where do we go from here?
Honestly, the sky’s the limit!
But there are a few recommendations to observe.
In most of the existing research into helpful haptic interfaces, their application can be split into three categories: sensory training, sensory augmentation, and sensory replacement. Each seek to improve, supplant, or add new senses in varying degrees. So as you begin to work on your next amazing haptic system, ask yourself:
- Who is your desired user?
- What are their needs or limitations?
- What sensor information is available?
- How should that data be presented?
From these simple questions y
ou could…
- Create a haptic boundary awareness system for VR to let players know when they near the confines of their physical play space without distracting visual cues.
- Use GPS data to give a user their bearing to a waypoint on a map. Just follow the buzz to reach your destination!
- Use haptics to alert First Person Shooter game players to the direction of their aggressors.
- Alert users of poor local air quality using a gentle-intensity buzz that increases as the amount of contaminants grows.
- Use heart-rate and body conductance sensors to create biofeedback loops to help users control negative emotional states.
But before you begin, there are a few recommendations to observe:
- Information that coincides with other existing senses works best.
In the case of our demos, the data coming from the compass is reinforced / corroborated by the user’s inner ear and vision as they move. This gives the brain more information about the context of this new haptic data. While there has been some success in using haptic devices to deliver information that has little connection to other senses, desired results are less probable.
[5]
- The human sense of touch isn’t like a digital input pin!
When our skin is stimulated, the brain is flooded with a continuum of varying information instead of discrete binary touch/no-touch states. So as you go about deciding how to present your digital sensor data to the user, think about using vibration intensity to its fullest extent and flow between state changes with smooth transitions.
This isn’t vital but it can really help!
With that said, lets look at some simple starting examples based on some of the research projects mentioned.
Haptic Cape Python Library
With the current state of the library, a haptic system’s code follows this pattern:
- Initialize all the hardware in the system
- Get data from the sensor(s)
- Process it into some form that can be mapped to the N tactors connected to the Haptic Cape each with an output range of [0:4095]
- Generate an N item long (or less) python dictionary in the form of {outputNum: vibrationLevel}
- Use that dictionary to update the Haptic Cape outputs
- Get sensor data and repeat!
To give a small example, to set outputs 0, 2, 4, and 6 to full power and the rest to off you’d need to call setDuty_dict() with:
d = {0: 4095, 1: 0, 2: 4095, 3: 0, 4: 4095, 5: 0, 6: 4095, 7: 0}

h.setDuty_dict(d)

# or if you know that 1, 3, 5, and 7 are already off you can just update the changes!

d = {0: 4095, 2: 4095, 4: 4095, 6: 4095}

h.setDuty_dict(d)

# Output states persist! So a little tracking of output state can really optimize things!
Sample Projects
Note
All programs / libraries listed, mentioned, or included below are all available in the
Haptic Cape BitBucket Repository
along with up-to-date pydoc generated documentation
. Just clone that repo into your project directory and run scripts from there instead of copy-pasting the code from this page.
Both of the current demos in the Haptic Cape library repository require the Seeed Studio
Grove Compass sensor
. It’s a cheap, easy to integrate sensor that offers a lot of room to explore haptic systems well documented in the studies mentioned elsewhere in this project. Though before we can start running code, we need to add the sensor to our Haptic Belt’s case.
Adding the Grove Compass Sensor to the Belt
Magnetoreception Belt
The first demo I wrote was a quick-and-dirty script that takes the current heading from the compass sensor and maps it to one of 8 tactors.
How to Run
Just cd into the Haptic Cape project directory you cloned earlier and run:
$ python demo_simple_direction_guidance.py
This is a cheap reproduction of how systems like the FeelSpace belt operate that aims to show just how easy it is it get a haptic system up and running using the Haptic Cape python library. Click the link below to read over the fully commented source code to see how the script operates.
[demo_simple_direction_guidance.py Source on BitBucket]
More Advanced Magnetoreception Belt with Blurring
As mentioned in the
recommendations earlier, anything you can do to make the output on the belt a little less binary can greatly improve the user experience of your haptic system. From this I took the basic magnetoreception example and added a "blurring" factor of sorts that makes the current direction flow around the belt in a very natural-feeling manner. The difference between this demo and the one before is honestly like night and day!
How to Run
Just cd into the Haptic Cape project directory you cloned earlier and run:
$ python demo_blurred_directional_guidance.py
This is a longer program but I’ll include it here for the sake of completeness and to show how sensor data can be massaged to better suit a haptic system.
[demo_blurred_directional_guidance.py Source on BitBucket]
Balance Belt
Lastly, I wanted to show how one sensor can be used for multiple situations just by changing how information is delivered to the user. Based loosely on the work of Kentala, E et al. on aiding those with balance difficulties stemming from inner ear damage, we take in compass information not to get a heading, but to measure the angle at which the user is tilting. Since the wearer is restricted to how far they can tilt (maximum 180 degree arc if we factor in falling over completely) we can use that to change our haptic presentation. Instead of rotating around the wearers waist in a circle, we’ll just buzz the side closest to the floor to give an indication of sway. Kind of tickling them to stand up straight.
Sensor Setup
Due to the limitations of the Grove 3-axis Compass, we need to reorient the sensor in order to measure user tilt. Just open up the case and move the velcro from the bottom of the case to the back facing the user. Now what was once our heading is now the side-to-side rotation.
How to Run
Just cd into the Haptic Cape project directory you cloned earlier and run:
$ python demo_simple_balance.py
Now this demo only accounts for tilt in one direction (side-to-side) so I’ll leave multi-axis tilt tracking as an exercise for the reader.
[demo_simple_balance.py Source on BitBucket]
Summary
Even though I don’t expect many people to follow in my footsteps to develop the entire haptic development platform as described above, just know that although the complex belt is one of the better-known interfaces, it is just one of many possible forms a haptic system can take. Even just a simple finger-mounted tactor connected to a PWM pin can be enough to get started. So as you go forward working on projects that require providing users with information, ask yourself:
Can any of this data be delivered through touch?
Or when you get a fancy new sensor, ask yourself:
Can I interface this with my body using a haptic interface?
I hope that the information presented here has at least made you aware of the growing field of research that surrounds haptic neuroprosthesis. This is a unique area of inquiry that allows developers to accomplish extremely interesting things with relatively little costs, risks, or technical know-how compared to other bio-hacking systems. I personally feel that the maker/hacker community is a perfect match to take these concepts out of the lab and start pushing haptic interfaces to new heights with applications that would never occur in an academic environment.
Special Thanks
Seeed Studio
for their speedy Fusion service and the excellent Grove line of sensors.
BeagleBoard.org
for the fantastic BeagleBone platform.
Adafruit
&
SparkFun
for their great breakout boards and documentation.
Precision Microdrives
for their stellar ERM/LRA application notes. Absolutely invaluable!
NXP
for the easy-to-use PCA9685 PWM controller the Haptic Cape is based around.
Last but certainly not least,
my family
for supporting me over the last 30 days.
Sources
1. Weisenberger JM, Broadstone SM, Saunders FA. Evaluation of two multichannel tactile aids for the hearing impaired.
J Acoust Soc Am.
1989;86:1764–75.
2.
Erp, Jan B.f. Van, and Hendrik A.h.c. Van Veen. "Vibrotactile In-vehicle Navigation System."
Transportation Research Part F: Traffic Psychology and Behaviour
7.4-5 (2004): 247-56. Web.
3.
Kentala, E., J. Vivas, and C. Wall. "Reduction of Postural Sway by Use of a Vibrotactile Balance Prosthesis Prototype in Subjects with Vestibular Deficits."
Annals of Otology, Rhinology & Laryngology
112.5 (2003): 404-09. Web.
4.
Graham-Rowe, Duncan. "Haptic Soldiers Guided by Buzzing Belt."
New Scientist
. 22 June 2011. Web. 28 Mar. 2016.
5. Nagel, Saskia K., Christine Carl, Tobias Kringe, Robert Märtin, and Peter König. "Beyond Sensory Substitution—learning the Sixth Sense."
J. Neural Eng. Journal of Neural Engineering
2.4 (2005). Web.
6. Shull, Peter B., and Dana D. Damian. "Haptic Wearables as Sensory Replacement, Sensory Augmentation and Trainer – a Review."
Journal of NeuroEngineering and Rehabilitation J NeuroEngineering Rehabil
12.1 (2015). Web.
7. Bains, S. (2007, April). Mixed Feelings. WIRED, 15(4). Archive:
http://www.wired.com/2007/04/esp/
Comments are not currently available for this post.