Categories: Beginner
MY STORY:
In this course, I wanted to apply what I learned throughout the semester in a simple project that can be easily replicated. I feel like incorporating the push button in the device makes it more interactive and fun with the user, and using already existing functions of record and play audio would not be too complex.
I struggled in the beginning with using Cloud9 as the terminal window, but I got used to it and became comfortable with Python. I also found it useful to play around with Flite (text to speech command system) in the beginning to ensure that my audio inputs and outputs were working properly.
BUILD INSTRUCTIONS:
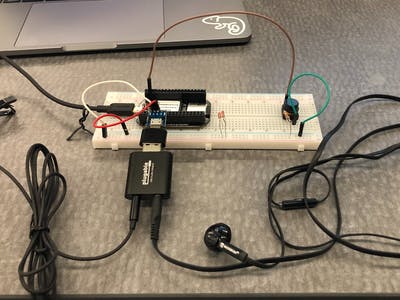
1. collect all of the needed hardware devices
2. solder the pocketbeagle pins (4 rows) and connect the UB & UI and ID & GND also by soldering them together

3. use the micro USB adapter to connect the female USB
4. add the plugable audio adapter to the USB port and attach the microphone and earphones to the respective places
5. add the push button anywhere you want
6. use the fritzing diagram to wire the breadboard (4 wires total) and add the resistors (3 total)
7. you have successfully wired build the device! (:
OPERATION INSTRUCTIONS:
1. press the push button
2. use the microphone to say what you want to record (immediately starts to record once the button is pressed, and
will continue to do so for 10 seconds)
3. then use the earphones to hear your audio file back (immediately after it records)
4. now you have a voice recorder/playback device! (:
VIDEO OF DEVICE:
https://github.com/bonnie1314/ENGI301/tree/master/project_01
^ for more information (README, code, and more) visit my github! (:
*** Also thanks to my ENGI 301 class and Professor Welsh for y’alls help!***
Comments are not currently available for this post.