Categories: Beginner
The final result for this project is the following:
Note that the breadboard was used solely to connect the resistor to the echo channel from the HC-SR04 sensor. You can remove the breadboard completely from your project, as long as you protect your BeagleBone with a 1.0 to 1.2 K-OHM resistor.
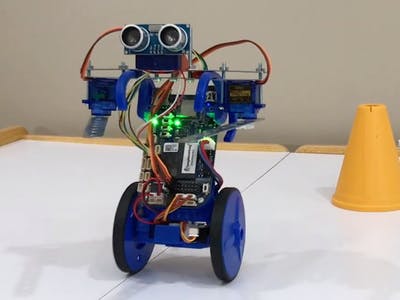
The cover picture for this project showed the ultrasonic HC-SR04 sensor added to an
EduMIP
platform. If your goal is to just have the range sensor working with your BeagleBone Blue, you may want to skip the EduMIP section at the end completely. If you want to add the distance sensor to an existing BluPants claw/gripper robot, follow all the instructions up to the "
BluPants claw/gripper robot
" section of this tutorial.
Connecting the HC-SR04 module
Use the JST jumper with 6 pins and connect it to the "GP0" socket in the BeagleBone Blue.
Use the JST jumper with 4 pins and connect it to the "Power out" socket in the BeagleBone.
Please find the BeagleBone Blue pinout diagram below. It might be helpful when trying to identify both the "GP0" and "Power out" connectors in your board:
For more detailed information about BeagleBone Blue pinout, please refer to this link:
https://groups.google.com/forum/#!category-topic/beagleboard/ZXSTPIcV4OU
Once you get your JST cables properly connected, use some jumpers to connect the HC-SR04 to the JST female connector. Make sure you use a 1K-OHM resistor for your echo jumper (blue wire for this project). Use a breadboard if necessary:
Once you complete the wiring your project should be analogous to the following diagram:
Measuring the distance with Python
Please find the sample Python3 module
hcsr04.py
on Github for testing your project:
#!/usr/bin/python3

# -*- coding: utf-8 -*-


import Adafruit_BBIO.GPIO as GPIO

import time


# HC-SR04 connection

# red wire

vcc = "5V"


# white wire

trigger = "GPIO1_25"


# blue wire using resistor

echo = "P9_23" #echo = "GPIO1_17"


# black wire

gnd = "GND"


GPIO.cleanup()

time.sleep(2)


def distance_measurement(TRIG,ECHO):

    GPIO.output(TRIG, True)

    time.sleep(0.00001)

    GPIO.output(TRIG, False)

    pulseStart = time.time()

    pulseEnd = time.time()

    counter = 0

    while GPIO.input(ECHO) == 0:

        pulseStart = time.time()

        counter += 1

    while GPIO.input(ECHO) == 1:

        pulseEnd = time.time()


    pulseDuration = pulseEnd - pulseStart

    distance = pulseDuration * 17150

    distance = round(distance, 2)

    return distance


# Configuration

print("trigger: [{}]".format(trigger))

GPIO.setup(trigger, GPIO.OUT) #Trigger

print("echo: [{}]".format(echo))

GPIO.setup(echo, GPIO.IN)  #Echo

GPIO.output(trigger, False)

print("Setup completed!")


# Security

GPIO.output(trigger, False)

time.sleep(0.5)


distance = distance_measurement(trigger, echo)

while True:

    print("Distance: [{}] cm.".format(distance))

    time.sleep(2)

    if distance <= 5:

        print("Too close! Exiting...")

        break

    else:

        distance = distance_measurement(trigger, echo)


GPIO.cleanup()

print("Done")
Demo
The
hcsr04.py
module will print the distance in centimeters every 2 seconds. If the object gets too close to the sensor (5 cm or less), it will interrupt the execution and exit.
BluPants claw/gripper robot
Assembling the robot
I recommend using those two tutorials for assembling your base gripper robot, so you can mount the distance sensor on the top of it:
After you get your base claw robot ready, you can add the distance sensor to it. You can do it in many different ways. You could for instance, use tape to attach it to the claw servo (as we did for the
Raspberry Pi robot
), or use a mount like this
one
:
The HC-SR04 sensor shown is fixed to the front of the robot. The part for adding a servo to pan the sensor was not used. Fell free to add it if you want to be able to pan your distance sensor.
The final result after attaching the HC-SR04 to the robot should be similar to this:
Another suggestion is to use a mini breadboard to save space on your chassis for future add-ons you may want to add.
After adding your distance sensor to your MVP or claw robot, you are ready to write some code with
BluPants Studio
.
EduMIP
Assembling the robot
I strongly recommend using this awesome tutorial for assembling your EduMIP:
https://www.hackster.io/edumip/edumip-13a29c
EduMIP: Using the HC-SR04 sensorto avoid obstacles
If you want to have the range sensor working with your EduMIP, please find this sample code on
Github
to allow your robot to randomly drive avoiding obstacles. It is based on the BluPants project, that can be installed to your existing BeagleBone Blue image. Please refer to the
instructions
available on the Github repo for further details.
Alternatively, you can simply install the BluPants
image
so you do not have to worry about all the software dependencies. To install the BluPants image, download the
blupants_beagleboneblue.img.xz image
from this
link
, and flash it to your robot according to the documentation from the BeagleBone official
Getting Started Guide
. After booting the image, you will need to edit two files in your Beaglebone:
Uncomment line:
/usr/bin/rc_balance_dstr -i dstr &
Set robot_id to 1:
"robot_id": 1,
After editing the file, reboot your Beaglebone, or restart the BluPants service:
sudo service blupants restart
Once the service is running g again you should be able to balance your robot and use the Blockly based programming platform
BluPants Studio
to control it.


Comments are not currently available for this post.