Categories: Intermediate
In this project I use a Beaglebone Blue to connect it to a CAN bus on a vehicle via OBDII port. I show how to use can-utils and python-can to send and receive CAN messages. I also cover how to connect a GPS module and a cellular modem to the Beaglebone, so you can remotely get and send data to a moving car. I use Python scripts to gather GPS coordinates and decode the CAN messages (car speed, engine, RPM, temperature, etc) and then send everything to a simple Flask server running on AWS.

The spy device we are building today is called ChupaCarBrah.
Parts
Those are the parts used to build ChupaCarBrah.
I use a plastic flush device cover plate to attach the Beaglebone, and rubber bands to fix the other parts. I had to drill two extra holes on the side of the cover plate to match the BeagleBone holes. I recommend using colored hook-up wires. The color standard used here is:
- Black: GND
- Red: VCC
- Yellow: CAN High
- Green: CAN Low
The BeagleBone pinout and the CAN connector is shown below. A JST/SH connector is required to connect the hook-up wires to the BeagleBone CAN slot.
Assembling
Connect the JST/SH connector to the CAN slot on the Beaglebone Blue as shown below
Connect your hook-up wires to the the female connector. In our case the connector has the following standard: Black: GND; Red: will not be used; Yellow: CAN Hi; White: CAN lo. Yours might be different.
- GND: JST/SH black – hook-up wire black
- CAN Hi: JST/SH yellow – hook-up wire yellow
- CAN Lo: JST/SH white – hook-up wire green
Connect the end of the black hook-up wire to the negative "-" slot on the DC Barrel Jack Adapter, but do not screw it yet. Get another black hook-up wire and insert in the same "-" slot. Screw the two black wires together.
Connect a red hook-up wire to the positive "+" slot on the DC Barrel Jack Adapter.
The DC Barrel Jack Adapter plugs to the Beaglebone 12V input jack. The OBDII will provide the 12V necessary to power up the BeagleBone.
Connect the hook-up wires to the female OBDII connector. You might need to check your vehicle manual, but usually the standard pinout for the OBDII is:
- Pin 5: signal GND
- Pin6: CAN Hi
- Pin14: CAN Lo
- Pin16: 12V
According to our hook-up wire color code convention, you need to connect black wire to OBDII pin5; yellow wire to pin6; green wire to pin14 and red wire to pin 16.
At this point you have already a functional device to interact with your car CAN bus via OBDII. If that is all you are looking for, skip to "CAN Bus with can-utils" section.
For building the complete ChupaCarBrah device, you still need to add the GPS module, the cellular modem and a battery. The battery is optional, but is is very important in the case your car’s battery dies, or the OBDII power gets disconnected (you would be able to locate your vehicle even if its battery goes completely dead).
Connect the GPS module to the UART GPS slot on the BeagleBone.
Connect your the USB cellular modem to the USB port on the BeagleBone. Make sure you already inserted a valid SIM card to the cellular modem before connecting it to the BeagleBone.
Attach the BeagleBone to a plastic plate or any other insulated material of your choice.
Make sure the GPS module and the battery are properly positioned to the bottom.
Put the OBDII cable over the battery and use rubber bands to fix everything.
Make sure the hook-up wires are secure to the OBDII connector. I used more rubber bands for it too.
Connect the battery, and your ChupaCarBrah will boot.
Now that you have the hardware ready, let’s setup all the necessary software so we can start playing with CAN messages.
CAN Bus with can-utils
Turn on your BeagleBone and
connect to it via WiFi
. I recommend using the cellular LTE network only for long distances in order to save some money on your data plan. Make sure you have can-utils/socketCAN installed and updated. Run the following commands:
sudo apt-get update
sudo apt-get upgrade
sudo apt-get install can-utils
After installing/updating can-utils, check if can0 interface is available
sudo ifconfig can0
root@beaglebone:~# sudo ifconfig can0

can0: flags=128<NOARP> mtu 16

unspec 00-00-00-00-00-00-00-00-00-00-00-00-00-00-00-00 txqueuelen 10 (UNSPEC)

RX packets 0 bytes 0 (0.0 B)

RX errors 0 dropped 0 overruns 0 frame 0

TX packets 0 bytes 0 (0.0 B)

TX errors 0 dropped 0 overruns 0 carrier 0 collisions 0

device interrupt 43
If you see a similar output with <NOARP> on the second line, it means your can0 interface is available and disabled. You want to have it down before you connect the ChupaCarbrah to the car. If you need to disabled it, run:
sudo ifconfig can0 down
And then check the state again with
sudo ifconfig can0
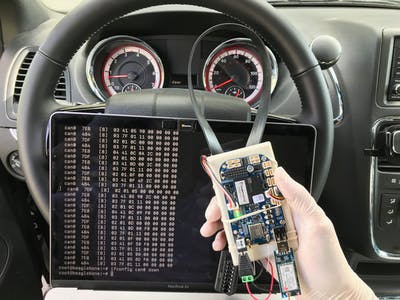
After confirming interface can0 is available and disabled, connect the ChupaCarBrah to your car OBDII port (a.k.a DLC – Data Link Connector). Refer to your car’s manual for the exact location, but it is usually under the dashboard close to the steering wheel.
After finish the whole setup, you may want to hide it inside your dashboard.
After physically connecting the ChupaCarBrah to your car, turn the ignition key on. You may want to start the engine to prevent killing your car’s battery (Do not make the same mistakes I did). Set the baud rate, in our case 500kbps, and turn the can0 interface on:
sudo ip link set can0 up type can bitrate 500000
sudo ifconfig can0 up
sudo ifconfig can0
root@beaglebone:~# sudo ifconfig can0

can0: flags=193<UP,RUNNING,NOARP> mtu 16

unspec 00-00-00-00-00-00-00-00-00-00-00-00-00-00-00-00 txqueuelen 10 (UNSPEC)

RX packets 0 bytes 0 (0.0 B)

RX errors 0 dropped 0 overruns 0 frame 0

TX packets 0 bytes 0 (0.0 B)

TX errors 0 dropped 0 overruns 0 carrier 0 collisions 0

device interrupt 43
As you can see, now the output contains "<UP, RUNNIG, NOARP>", which means, that you are ready to send some CAN messages. Open another terminal (ssh session) and run:
sudo candump can0
Depending on your vehicle you might be able to see a lot of messages being captured, similarly to this:
can0 418  [8] 50 FF 60 00 00 20 00 00

can0 412  [6] 1E 00 7A 00 8E 00

can0 2F1  [8] 00 00 79 00 00 00 00 00

can0 300  [8] 00 1B 80 89 9F FF 80 0A

can0 248  [8] 00 08 00 09 00 00 41 01

can0 236  [8] 0F FF 10 00 F0 00 00 39

can0 328  [8] 00 00 80 00 D8 80 FF FF

can0 330  [8] 0C FC FC FF FF FF 3F 89

can0 210  [8] 00 00 00 00 00 00 00 00

can0 308  [8] 40 02 B0 40 01 1F FF 00

can0 309  [7] 1F FF FF FF 0F FF 00

can0 312  [8] 67 EF 07 EF 09 BF 07 92

can0 356  [7] 3F FF 3F FF 0B B8 00

can0 7BC  [8] 40 00 00 00 00 00 00 00

can0 218  [8] 8E 38 DD 42 00 80 00 00

can0 338  [8] FF FF 00 FF FF 00 FF FF

can0 315  [7] 28 00 00 00 00 8D 00

can0 200  [8] 00 03 C0 00 C0 00 C0 00
However, for some vehicles, including mine, the ODBII CAN bus is quiet by default, and will only react to the messages sent to the bus. If that is your case too, you can confirm CAN is working by using the "cansend" command to send a message retrieving the vehicle VIN number. Leave "candump" running on the second terminal and go back to the first one. Then run:
sudo cansend can0 7DF#0209020000000000
On the terminal running "candump", you should be able to see a request and responses similarly to this:
root@beaglebone:~# candump can0

can0 7DF  [8] 02 09 02 00 00 00 00 00

can0 7E8  [8] 10 14 49 02 01 32 43 34

can0 484  [8] 03 7F 09 11 00 00 00 00
The response "7E8" on the second line, has the 3 last bytes set to 32 43 34. If we decode it from hexadecimal to ASCII, we get "2C4" which are the actual the 3 first digits of my vehicle VIN.
You can use this online VIN decoder to confirm the data is accurate:
https://vpic.nhtsa.dot.gov/decoder/Decoder
The message sent to get the VIN number was "7DF#0209020000000000". 7DF is the CAN arbitration ID (you want to use a high number like this for testing, since higher numbers have lower priority). The "0209020000000000" is the data field:
- "02": data length
- "09": service ID 9
- "02": read VIN command
- "0000000000" ignored
The first "02" byte indicates that only the next two following bytes on the data field are part of the command. The remaining "00" bytes are all ignored;
If you want to try to manually send other commands, please refer to:
https://en.wikipedia.org/wiki/OBD-II_PIDs
Now that you confirmed can-utils is working fine, let’s use the Python to send more commands. First, make sure you have the python-can pip module installed:
sudo python3 -m pip install python-can
Then, run
get_vin.py
to retrieve your car’s VIN. This is the Python code for
get_vin.py
:
import can


bus = can.interface.Bus(bustype='socketcan', channel='can0', bitrate=500000)


service_int = 9

pid_int = 2

msg = can.Message(arbitration_id=0x7DF, data=[2, service_int, pid_int, 0, 0, 0, 0, 0], is_extended_id=False)

try:

    bus.send(msg)

    response = bus.recv(timeout=2)

    print(response)

except can.CanError:

    print("CAN error")

finally:

    bus.shutdown()
sudo python3 get_vin.py
Feel free to change the values of "
service_int
" and "
pid_int
" and test other commands from the
OBDII PID documentation
.
Retrieving GPS data
To test your GPS module, simply run:
tio /dev/ttyO2 -b 4800
You should get a data stream similar to this:
root@beaglebone:~# tio /dev/ttyO2 -b 4800

[tio 17:04:53] tio v1.32

[tio 17:04:53] Press ctrl-t q to quit

[tio 17:04:53] Connected

$GPGGA,170454.000,3500.87097,N,10641.14163,W,1,08,1.1,204.3,M,-34.0,M,,0000*69

$GPGSA,A,3,30,07,11,28,01,08,17,13,,,,,2.2,1.1,2.0*33

$GPRMC,170454.000,A,3500.87097,N,10641.14163,W,0.00,171.40,100520,,,A*79

$GPGGA,170455.000,3500.87097,N,10641.14163,W,1,08,1.1,204.3,M,-34.0,M,,0000*68

$GPGSA,A,3,30,07,11,28,01,08,17,13,,,,,2.2,1.1,2.0*33

$GPGSV,3,1,12,30,74,271,37,07,62,163,35,11,51,074,37,28,46,294,18*74

$GPGSV,3,2,12,01,41,120,31,08,30,049,31,17,26,226,27,13,23,302,28*73

$GPGSV,3,3,12,15,04,323,14,23,16,208,,19,03,224,,09,00,189,*77

$GPRMC,170455.000,A,3500.87097,N,10641.14163,W,0.00,171.40,100520,,,A*78

$GPGGA,170456.000,3500.87097,N,10641.14163,W,1,08,1.1,204.3,M,-34.0,M,,0000*6B

$GPGSA,A,3,30,07,11,28,01,08,17,13,,,,,2.2,1.1,2.0*33

$GPRMC,170456.000,A,3500.87097,N,10641.14163,W,0.00,171.40,100520,,,A*7B

[tio 17:04:56] Disconnected
Press "ctrl-t q" to quit. Your location will be available on sentence "GPRMC". For instance, copy the sentence "
$GPRMC, 170454.000, A, 3500.87097, N, 10641.14163, W, 0.00, 171.40, 100520,,, A*79
" and decode it using this online decoder:
https://rl.se/gprmc
Zoom in the map, and see how accurate the GPS data is.
Now, let’s do the same thing using Python. Make sure you have the pyserial module installed:
sudo python3 -m pip install pyserial
Then, run
get_gps_data.py
to retrieve your car’s location. This is the Python code for
get_gps_data.py:
import time

import serial


gps_data = ""

utf_data = ""

ser = serial.Serial('/dev/ttyO2', 4800)

counter = 0

while utf_data.find("GPRMC") == -1:

    counter += 1

    try:

        ser_data = ser.readline()

        utf_data = ser_data.decode()

    except:

        utf_data = ""

    time.sleep(0.5)

    if counter > 50:

        break

ser.close()

if utf_data.find("GPRMC") != -1:

    utf_data = utf_data.replace('\r', '')

    utf_data = utf_data.replace('\n', '')

    gps_data = utf_data


print(gps_data)
sudo python3 get_gps_data.py
root@beaglebone:~# sudo python3 get_gps_data.py

$GPRMC,173439.000,A,3500.87097,N,10641.14163,W,0.00,348.52,100520,,,A*74
The next step is to create a cellular LTE data link so you can get access to the GPS and CAN data even when the car is out of our WiFi network range.
Connecting ChupaCarBrah to a Cellular network
For this tutorial I use an USB
Hologram.io
cellular modem. Feel free to use other options. I will use a PPP connection, so the Python client can send data to the server app running on AWS. Make sure you have ppp installed, and then install hologram-python:
sudo apt-get install ppp
sudo python3 -m pip install hologram-python
You will also need to subscribe to data plan and activate your SIM card. Please refer to the official
Hologram documentation
to get your card ready.
After activating your card, make sure your blue LED is on and the red LED is blinking on your modem.
Then, for connecting and disconnecting to the cellular network run:
sudo hologram network connect
sudo hologram network disconnect
In order to test the Internet connection, you may ping Google with a single ICMP request:
ping -c 1 www.google.com
If you get a response it means that ChupaCarBrah is connected to a cellular network, and it should be able to exfiltrate the car data anywhere you drive within LTE coverage (virtually everywhere in the US).
Now, let’s see how to connect and disconnect the Hologram cellular network using Python. Run the
cellular_test.py
script to check your LTE data connectivity to the internet. This is Python code for the sample script
cellular_test.py:
import psutil

import time

import subprocess

from Hologram.CustomCloud import CustomCloud


def hologram_network_connect():

    hologram_network_disconnect()

    time.sleep(2)

    cloud = CustomCloud(None, network='cellular')

    cloud.network.disable_at_sockets_mode()

    res = cloud.network.connect()

    message = ""

    if res:

        message = "PPP session started"

    else:

        message = "Failed to start PPP"


    print(message)


def hologram_network_disconnect():

    print('Checking for existing PPP sessions')

    for proc in psutil.process_iter():


        try:

            pinfo = proc.as_dict(attrs=['pid', 'name'])

        except:

            print("Failed to check for existing PPP sessions")


        if 'pppd' in pinfo['name']:

            print('Found existing PPP session on pid: %s' % pinfo['pid'])

            print('Killing pid %s now' % pinfo['pid'])

            process = psutil.Process(pinfo['pid'])

            process.terminate()

            process.wait()


hologram_network_connect()

time.sleep(2)


ping_response = subprocess.Popen(["/bin/ping", "-c1", "-w100", "www.google.com"], stdout=subprocess.PIPE).stdout.read()

print(ping_response.decode())


time.sleep(2)

hologram_network_disconnect()
sudo python3 cellular_test.py
root@beaglebone:~# sudo python3 cellular_test.py

Checking for existing PPP sessions

PPP session started

PING www.google.com (216.58.201.228) 56(84) bytes of data.

64 bytes from par10s33-in-f4.1e100.net (216.58.201.228): icmp_seq=1 ttl=49 time=420 ms

--- www.google.com ping statistics ---

1 packets transmitted, 1 received, 0% packet loss, time 0ms

rtt min/avg/max/mdev = 420.049/420.049/420.049/0.000 ms

Checking for existing PPP sessions

Found existing PPP session on pid: 1559

Killing pid 1559 now
Now that you know how to use Python to send and receive CAN messages; to get GPS location; and to connect to a cellular network; let’s put it all together and create a dead simple client and server application to exfiltrate all that data.
ChupaCarBrah Python app
I bring you two very simple Python scripts that can serve as a framework to build more sophisticated car hacking applications. The client script is basically the combination of all sample Python scripts I have presented so far. It will run on the BeagleBone Blue. The server script is bare simple Flask application that will run on AWS (Elastic Beanstalk) and will store and display all the exfiltrated data using JSON format.
Client Script – chupacarbrah.py
The
chupacarbrah.py
client script can be found
here
. Clone it to your BeagleBone using the following git command:
git clone https://github.com/blupants/chupacarbrah.git
cd chupacarbrah
The client script reads a list of OBDII PIDs commands to be executed from a csv file defined by the variable "
obd2_csv_file
". Then it parses the commands to create CAN messages. The csv file format includes an "Enabled" column that allows you to enable (set to 1) or disable (set to zero) the specific OBDII PIDs you want to execute. By default the script uses the
simple.csv
file with the following subset of commands:
- Engine coolant temperature
- Engine RPM
- Vehicle speed
- Intake air temperature
The file
obd2_std_PIDs_enabled.csv
contains all available OBDII PIDs commands to be enabled/disabled. Please make sure you understand what the commands do, and know what you are doing before enabling extra commands.
The chupacarbrah.py client script will decode all responses using the OBDII PIDs formulas from the csv file and POST the data along with the GPS coordinates to your Flask app on AWS. Make sure you define your server URL on the variable "
server_url
". We will cover how to deploy the server script to AWS and how to get the server URL shortly.
Once you configured your client app properly you can run it:
sudo python3 chupacarbrah.py
It will show the current data decoded from the CAN response messages, and send everything to the server every 1 minute.
To stop the client and exit gracefully, run:
sudo touch /tmp/stop
Now, let’s set the server script to receive the exfiltrated data.
Server script – chupacarbrah_server.py
The
chupacarbrah_server.py
script can be found here. It will expose two endpoints so you can send and get exfiltrated data:
POST /api/v1/cars
GET /api/v1/status
The client script will use the "POST /api/v1/cars" endpoint to submit all the data. Then, you can use the "GET /api/v1/status" to monitor the JSON data from your web browser from the comfort of your home.
Let’s setup a simple local Flask app and run some quick tests on those two endpoints. Later on this tutorial, I will show how to deploy this same local app to AWS.
On your local PC, not the BeagleBone, create a project directory:
~$ mkdir eb-flask
~$ cd eb-flask
Create and activate a virtual environment named "virt":
~/eb-flask$ virtualenv virt
~$ source virt/bin/activate
(virt) ~/eb-flask$
Install flask with pip install:
(virt)~/eb-flask$ pip install flask==1.0.2
View the installed libraries with pip freeze:
(virt) sacchetin@Sacchetins-MacBook-Air eb-flask % pip freeze

aniso8601==8.0.0

click==7.1.2

Flask==1.0.2

Flask-RESTful==0.3.8

itsdangerous==1.1.0

Jinja2==2.11.2

MarkupSafe==1.1.1

pytz==2020.1

six==1.14.0

Werkzeug==1.0.1

(virt) sacchetin@Sacchetins-MacBook-Air eb-flask %
Save the output from pip freeze to a file named requirements.txt.
(virt)~/eb-flask$ pip freeze > requirements.txt
Download the
chupacarbrah_server.py
to your
eb-flask
folder and rename it to
application.py:
curl "https://raw.githubusercontent.com/blupants/chupacarbrah_server/master/chupacarbrah_server.py" -o application.py
Run the application locally for testing:
(virt) sacchetin@Sacchetins-MacBook-Air eb-flask % python3 application.py

* Serving Flask app "application" (lazy loading)

* Environment: production

WARNING: Do not use the development server in a production environment.

Use a production WSGI server instead.

* Debug mode: off

* Running on http://127.0.0.1:5000/ (Press CTRL+C to quit)
Send some dummy data to make sure everything is working. Open a new terminal and use curl to send some data:
curl --header "Content-Type: application/json" \


--request POST \


--data '{"car_uuid":"51f317ec266e4adb956212201f87ba52", "VIN": "2C4", "maker": "Generic", "log":{"timestamp":"20200501120000","GPS":"00"}}' \


"http://localhost:5000/api/v1/cars"
The local server will reply with the car_uuid, in this example: "51f317ec266e4adb956212201f87ba52". Open a browser, preferentially Firefox because it parses JSON natively, and visit
http://localhost:5000/api/v1/status
If you are able to see the dummy data you have just posted with curl, it means your Flask app is ready está be deployed to AWS.
Deploying ChupaCarBrah server app to AWS
First, you will need to create an account on AWS and install the AWS clients on your machine. Please create your AWS account
here
. The steps described for deploying the application are based on the official
AWS documentation
found
here
.
Make sure you are able login to the AWS console. Then, install the AWS clients:
python3 -m pip install awscli
python3 -m pip install awsebcli
Initialize your EB CLI repository with the eb init command:
~/eb-flask$ eb init -p python-3.6 flask-chupacarbrah --region us-east-2
Optional, but strongly recommended: Run eb init again to configure a default key pair so that you can connect to the EC2 instance running your application with SSH:
~/eb-flask$ eb init
Do you want to set up SSH for your instances? (y/n): ySelect a keypair. 1) my-keypair 2) [ Create new KeyPair ]
Create an environment and deploy your application to it with eb create:
~/eb-flask$ eb create chupacarbrah-env
Environment creation takes about 5 minutes. When the environment creation process completes, open your web site with eb open:
~/eb-flask$ eb open
It will open a web browser and automatically load the URL of your new service. Copy the URL, go back to your BeagleBone, and edit the client script chupacarbrah.py and change the variable "
server_url
" to the actual URL of your AWS app. Using the my deployment example, the value for the "
server_url
" should be set to:
global server_url

server_url = "http://chupacarbrah-env.eba-bdahj3wp.us-east-2.elasticbeanstalk.com/"
Your URL will be different, but the format should be similar. Restart chupacarbrah.py on your BeagleBone, and from now on, it will start sending data to AWS.
You can alternatively send some dummy data to your AWS app for testing purposes. Repeat the "POST /api/v1/cars" curl request by replacing localhost:5000 by the same value you set variable "
server_url
". For instance:
curl --header "Content-Type: application/json" \


--request POST \


--data '{"car_uuid":"51f317ec266e4adb956212201f87ba52", "VIN": "2C4", "maker": "Generic", "log":{"timestamp":"20200501120000","GPS":"00"}}' \


"http://chupacarbrah-env.eba-bdahj3wp.us-east-2.elasticbeanstalk.com/api/v1/cars"
Open a Firefox browser and visit
http://chupacarbrah-env.eba-bdahj3wp.us-east-2.elasticbeanstalk.com/
again. You should see all the dummy data you sent along with all the exfiltrated data from your ChupaCarBrah device.
Hacking cars with your new ChupaCarBrah device
I am currently working on a series of cyber security write-ups about car hacking. Stay tuned to my
Medium page
to learn more about all you can do with your ChupaCarBrah device you have just built today.
Comments are not currently available for this post.