Categories: Beginner
Christmas Countdown with BeagleBoard.org® PocketBeagle®
There are lots of ways to connect PocketBeagle® up to LED strands and matrices thanks to the powerful on-board Programmable Real-time Unit (PRU) microcontrollers and some folks have made a career out of doing just that. The good news for you is there are now some wonderful tools to make it really easy and affordable to build very fancy animated
Christmas lights and displays
and this is a nice way to dip your toe in these waters with tools that could eventually land you on The Great Christmas Light Fight!

For more Holiday Projects with PocketBeagle®
Check out this blog.
Choices on the Things
The hardware
The controller hardware set me back about $75, including PocketBeagle, PocketScroller LED Panel Cape for PocketBeagle, and USB Wifi dongle. While, I spent about another $100 for a nice quality RGB LED panel and power supply from Adafruit, I’ve found similar for under $30 on Amazon and Aliexpress. Your mileage may vary, but I expect they’ll work just fine and I’ve ordered a couple myself to find out.
Further, realize that these 64×32 LED panels have 2048 RGB LED segments! Using something like NeoPixels or DotStar LEDs where the controller smarts are in the LED segments themselves, you could easily spend 10, 20 or even 50 times as much, depending on your sources. Also, the controller is capable of driving 4 panels deep and 6 panels tall (256 x 192) while still doing 30fps refresh rates at 9 bits-per-pixel for a total of around 30 MILLION pixel updates per second! Have I ever mentioned these PRUs are powerful?
As I hope you can see, while I would certainly have more fun with more panels, the bang-for-the-buck and ability to grow made this a nice place to start.
The software
I chose Falcon Christmas’ Falcon Player (FPP) as my software controller because it provides a good initial experience and, again, lots of room to grow with integration to tools like xLights. While I could have easily started with something
closer-to-the-metal,
the ability to update the panels with simple memory update scripts made it easy to get low-level enough without souring me on implementation details. Falcon Christmas provides microSD card images for BeagleBone Black that are compatible with PocketBeagle, so there was minimal need for doing any software development or configuration, but the scripts are all there to do the software installation on a default
BeagleBoard.org
Debian image.
Prepare microSD card
1) Download the Falcon Player version 2.4 microSD card image
The file "FPP-v2.4-BBB-btrfs.zip" for BeagleBone/PocketBeagle is available from
https://github.com/FalconChristmas/fpp/releases.
Note that I chose the ‘btrfs’ image as I understand them to be more robust to power failures as well as save more space on the microSD card.
Aside: I
reported a small issue
in version 2.3 that was quickly fixed in version 2.4. That’s the amazing thing about tools like this, there’s actually active developers and an interactive community of users! Try getting that with off-the-shelf commercial products. 🙂
2) Download Etcher
Download Etcher from
etcher.io
. It is a tool to write images to microSD cards. It is also awesome and open source.
3) Write FPP-v2.4-BBB-btrfs.zip to microSD card using Etcher
You don’t need to extract the ".img" file from the ".zip" because Etcher is awesome and does the extraction for you on-the-fly.
4) Verify microSD card image
[optional]
To verify the microSD card image, I inserted the microSD into my PocketBeagle then connected my PocketBeagle to my computer via a microUSB cable. The USR0 LED blinks in a "heartbeat" pattern and I was able to visit the Falcon Player control panel at
http://192.168.7.2
in the Chrome web browser. For a debug serial interface, if needed, you can use the
USB UART click board from MikroElectronika
. I had a
separate
PocketBeagle with female headers on
top
, instead of bottom, where I could plug this adapter in over the microSD card. This is a totally unnecessary item, but figure it is handy to document some debug processes here for those who might get stuck. It is possible to power the PocketBeagle via the USB UART click board by pressing the power button on PocketBeagle while the USB UART click board is powered via USB. Also note that a virtual serial port should also show up on your host computer and you can use any serial terminal software to access the board that way after it has booted. The ‘root’ password is ‘root’. 🙂
Assemble the hardware
1) Buy PocketBeagle pre-soldered to the PocketScroller
Personally, at least on my first build, I soldered it with female headers on PocketBeagle, but buying the pre-soldered version will save you time and simplify my instructions. 🙂
Note that on my first build I removed the screw terminal block and soldered wires directly in the holes where the screw terminal block was, so your will look slightly different there.
Note also that I have the microSD card plugged in from my previous verification step and I’ll assume you have yours plugged in on future steps.
2) Connect 5V barrel adapter to the provided power cable for the panel
3) Connect the power cable to the LED panel
4) Screw wires to the PocketScroller power inputs
Personally, on my first build, I had a challenge with this, so I removed the screw terminals and soldered the wires directly to the board. I believe my fundamental issue was having too large of a screwdriver. Just make sure the red wire is connected to the
5V
terminal and the black wire is connected to the
GND
terminal.
Below is a picture of my second build, where I didn’t remove the screw terminal block. Near the bottom of this project, I snagged some pictures of my completed second and third builds. 🙂
5) Plug wires into the other power cable connector
Red-to-red, black-to-black. It should fit snug enough to not want to fall out, other wise you might want to break out a soldering iron or clip and strip the wires to connect directly on the screw terminals of the PocketScroller.
6) Connect the ribbon cable between LED panel input and PocketScroller J1
The ribbon cable is keyed, so you won’t plug it in backwards. Just make sure you connect to
J1
on the PocketScroller and the input side of the LED panel. You’ll notice arrows pointing left-to-right on the panel and you’ll want to use the connector on the left-side of the power.
7) Plug in the USB WiFi adapter
Your adapter might look different.
Completed assembly
You might choose to make some sort of enclosure after testing the LED panel, but this is where I stopped the mechanical build for the time being.
Boot it up and configure the software
1) Plug in the 5V power supply
Do this before connecting the USB cable to make sure you don’t try to draw panel power from your USB cable. You should see LEDs light up on your PocketBeagle within 30 seconds, including a heartbeat pattern on the USR0 LED.
WARNING
: Be absolutely sure you are connecting a 5V supply!
2) Connect up the USB cable between your PocketBeagle and a host computer
3) Get to the FPP control panel
Open up
http://192.168.7.2
in your Chrome or Firefox web browser.
the Falcon Player manual Chapter 5: Input/Output section on channel outputs
for some details on how to do this. For this panel, we need to set the single panel size to "64×32 1/16 scan". The "1/16 scan" part is in the panel specification and lets you know that 1 out of every 16 rows is scanned at a time. This
Sparkfun blog post on "Everything You Didn’t Want to Know About RGB Matrix Panels"
helps make these scan rate specifications easy to understand. Everything else can stay at the defaults. When you start to look at how you could build out a bigger display, the flexibility of Falcon Player starts to show its beauty. Pretty easy, eh?
https://github.com/MarkAYoder/PRUCookbook
then continue to this link
https://markayoder.github.io/PRUCookbook/
then this link
https://markayoder.github.io/PRUCookbook/01case/case.html#case_rgb_matrix
or scroll down to section 1.4
RGB LED Matrix – No Integrated Drivers (Falcon Christmas)
.
After testing uncheck the "Enable Test Mode" box before loading clock script.
8) Add the script
Copy the code from this project (PixelOverlay-Countdown.pl).
Open file manager, click on select files under upload files section and add the perl script. Then click on the
Scripts
tab and you will see the below. Choose the ".pl" program and click
Run
.
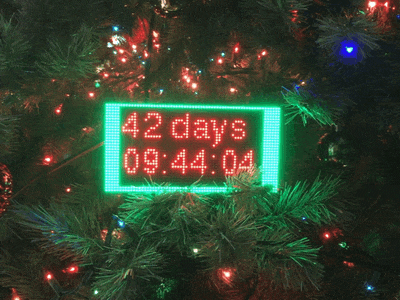
Your count down clock will now display on the matrix!
Demonstration Video
Bonus builds
I’ve had a number of HUB75 LED matrix panels laying around for other projects, so I threw on a PocketBeagle, PocketScroller Cape for PocketBeagle and Christmas countdown software on those too.
Five
32×16 LED Panels
These are the medium pitch 32×16 panels available from Adafruit at
https://www.adafruit.com/product/420.
Sixteen 32×32 panels
These are the 6mm pitch 32×32 panels available from Adafruit at
https://www.adafruit.com/product/1484.
The frame was built of learning from the tutorial at
https://learn.adafruit.com/adafruit-diy-led-video-wall
and placed on a simple art easel. I hope to eventually hang this one over a window with less obstruction.
Resources
http://falconchristmas.com/forum/index.php/topic, 8265.0.html
https://markayoder.github.io/PRUCookbook/
https://markayoder.github.io/PRUCookbook/01case/case.html#case_rgb_matrix
microSD card Image used:
https://github.com/FalconChristmas/fpp/releases/download/2.4/FPP-v2.4-BBB-btrfs.zip
Issue fixed to enable boot:
https://github.com/FalconChristmas/fpp/issues/451
Script for countdown timer:
https://github.com/FalconChristmas/fpp-scripts/blob/master/PixelOverlay/PixelOverlay-ScrollingText.pl
Instructions for pixel overlay setup:
https://falcon-player.gitbooks.io/falcon-player-manual/content/chapter_five_inputoutput_setup/pixel_overlay_models.html
Updated script:
https://gist.github.com/jadonk/fa3d9b96c81bd473064b0db542196311
Comments are not currently available for this post.