Categories: Beginner
Hello,
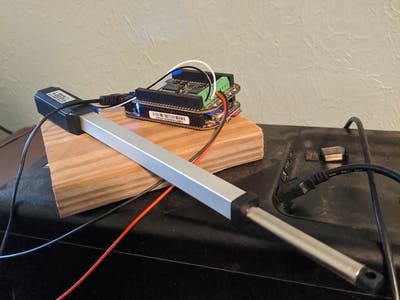
First, get a BBBW (BeagleBone Black Wireless), a MotorCape, and some linear actuators (one is good for this time around).
Also, you will need a crimper for crimping quick disconnects for a 12v 1.3A lead acid battery.
You will also need a screw driver in the form of standard or a so-called flat head.
You will need a set, only two, of wires for connecting to your MotorCape from GHI.
One will also need a Mirco USB to USB cable for debugging.
Oh and please use a barrel jack on your BBBW when testing out the source on your BBBW, MotorCape, 12v battery, and linear actuator.
The BBBW w/ the new image comes w/ Adafruit_BBIO preinstalled. So, all we need to install is Flask w/ pip3.
pip3 install flask
…
So, I think that covers a little. Now…we need to get an image from
bbb.io
at
https://staging.digitalblender.co/latest-images.
For the BBBW, since the SiP has a am335x in it, we need to grab the appropriate IoT image from that listed site.
It seems to make sense to use a bsp (Board Support Package) with the BBBW since they are both from similar individuals with similar goals, i.e. education.
So, we, you and I, should have a bunch of neat toys to play with now and a fresh install of a Debian Buster image on the BeagleBone Black Wireless board from beagleboard.org.
Okay.
Now…we need to be extra cautious. 12v batteries, no matter what people say, can pack a punch, e.g. an actual punch that never stops until it is done releasing energy.
So, take extra precautions when crimping your quick-disconnects with your crimping tool. Also, make sure your quick disconnects are of the same size as your battery terminals. So, if your 12v 1.3A AGM (Advanced Gel Mat) lead acid battery has F1, T1, or Faston.187 terminals like mine does, use the appropriate quick disconnects. Let us see. Maybe showing some positive links now for batteries would be a good idea.
…
https://www.te.com/usa-en/product-641321-1.html
That product connects to the 0.187" terminal on a battery. So, you are going to have one for the positive wire and one for the negative wire of your, in this case, linear actuator.
Okay…So! This fellow online describes how their actuators, in general, work. It is a good video. Enjoy it and you can see these in action without having to set up your actuator just yet.
…
I have another type of linear actuator that it telescoping and retracting. It is basically a push/pull mechanism and not a rolling movement like with two wheel or four wheel robots.
…
But…my encasement on my actuator houses some very intricate pieces that make this motor cause a telescoping movement with an outer aluminum exterior.
…
So, we still need source, to attach the MotorCape, and to attach the rest of the components but first!
We are going to plug our BBBW into our development desktop. This way, we can use some source for when we plug in everything, e.g. wires to the actuator, wires to the battery, barrel plug to the wall socket from our BBBW barrel plug, and the Micro USB to USB.
Okay…
So, we need to type up some source:
from flask import Flask, render_template

import Adafruit_BBIO.GPIO as GPIO

import Adafruit_BBIO.PWM as PWM


class Motor:

    def __init__(self, dir_pin, pwm_pin, pwm_freq):

        self.dir_pin = dir_pin

        self.pwm_pin = pwm_pin

        self.value = 0


        PWM.start(pwm_pin, 0, pwm_freq)

        GPIO.setup(dir_pin, GPIO.OUT)


    def set(self, value):

        assert -100 <= value <= 100

        if (value < 0) != (self.value < 0):


            # changing direction

            PWM.set_duty_cycle(self.pwm_pin, 0)

            GPIO.output(self.dir_pin, value < 0)


        PWM.set_duty_cycle(self.pwm_pin, abs(value))

        self.value = value


motor1 = Motor(dir_pin="P8_18", pwm_pin="P9_16", pwm_freq=2000)


def updates(state=None):


    if state == "E":

        motor1.set(100) # expanding!


    if state == "S":

        motor1.set(0) # stopping!


    if state == "R":

        motor1.set(-75) # retracting!


    template_data = {

        "title" : state,

    }

    return render_template("Boot.html", **template_data)


if __name__ == "__main__":

    app.run(host="0.0.0.0", port=5000, debug=False)
Okay. So, that is a starter. Good, heh? Now, we can start, stop, and retract what we are doing.
Nice!
…
If you get bored w/ this one retracting-expanding mechanism, there is always a way to make more, three more, with this Cape from GHI Electronics.
So, you can have a total of four expanding and retractable linear actuators at your peril. You can make wheels on the end or have them as legs for your nifty bot. Who knows what you will be able to make?
Okay…so.
Now, we need a server from the Flask microservices. Make a directory called Blah and cd into that dir. Now, make another directory called templates. In the templates dir, use this source and make a html file called BlahBlah.html.
<!DOCTYPE html>

<html lang="en">

<head>

  <title>{{ status }}</title>

  <meta charset="utf-8">

  <meta name="viewport" content="width=device-width, initial-scale=1">

  <link rel="stylesheet" href="https://maxcdn.bootstrapcdn.com/bootstrap/3.3.7/css/bootstrap.min.css">

  <script src="https://ajax.googleapis.com/ajax/libs/jquery/3.3.1/jquery.min.js"></script>

  <script src="https://maxcdn.bootstrapcdn.com/bootstrap/3.3.7/js/bootstrap.min.js"></script>

</head>

<body>


<div class="jumbotron text-center">

  <h1>MotorCape and BBBW!</h1>

  <p>This is a quick example on making an actuator move!</p>

</div>


<div class="container">

  <div class="row">

    <div class="col-sm-4 text-center">

      <h3>Agent One</h3>

      <p>More text and fun makings in life...</p>

      <p>Get ready to control some motors!</p>

    </div>


    <div class="col-sm-4 text-center">

      <h3>Agent Two</h3>

      <hr>

      <a href="/E" id="on" class="button">EXTEND</a>

      <br><br>

      <a href="/S" id="on" class="button">STOP</a>

      <br><br>

      <a href="/R" id="on" class="button">RETRACT</a>

    </div>

  </div>

</div>


</body>

</html>
I got some of this source from various sources and combined, excluded, and over time I have forgotten exactly what came from where but if you catch me, please add anything you deem worthy as your source. Oh and I got some of this code from w3schools.com.
Do not add power to your board yet. If it is on because you were putting the source in the correct directories, use sudo shutdown -h now to power down your board. Please remember to not add power to the board while you are messing with wiring. It is dangerous for the board and you.
Next, we need to add the wiring to our screw terminals in the MotorCape. So, w/ the crimps already made, hopefully for the battery terminals, put your red wire in the Positive port on your screw terminal. Then, add the GND cable/wire on your MotorCape screw terminal. Please remember that with batteries, polarity matters.
Polarity: the relative orientation of poles; the direction of a magnetic or electric field. I got this definition from the Dictionary online.
First, plug in your BBBW to the Development Desktop via Micro USB to USB, plug in your barrel jack to the wall outlet, and plug in your NEGATIVE quick disconnect first before applying power to the Cape via your 12v battery. Now, you can apply POSITIVE power to your Cape with the red wire with the quick disconnect.
…
Now, hopefully we are all still alive and moving. If not, please reread the article and be safe first and foremost.
…
If you see that I am incorrect or need to have some corrections made, please do contact me.
…
So, everything should be plugged in and working. If you sign in to your board, the BBBW, and go to your dir. that you made, run your source w/ python3 blah.py.
This should run a small program that allows you to open up a browser, Chrome, to your IP addresss of your board, plus the port number 5000, and to control your linear actuator.
Seth
P.S. Oh and here are some photos if you get down. I can provide some type of info. if you need for me to explain anything at any point in time.

Comments are not currently available for this post.