Categories: BeagleBone Black
- Debian Image: bone-debian-7.5-2014-05-14-2gb
- Kernel: Linux 3.8.13-bone50
- Drivers: fbtft-2014-02-07-3.8.13-bone50.tar.gz
- Displays that I used:
- Adafruit 1.8″ TFT LCD (usingfb_st7735rdriver)
- Adafruit 2.2″ TFT LCD (usingfb_ili9340driver)
- Photos of wiring and LCD demo
- Videos of LCD demo
- Based on instructions from fbtft wiki
- GitHub Gist with complete transcript of running the below instructions
Step 1: Download, Flash & Boot Image
Download bone-debian-7.5-2014-05-14-2gb image:
http://debian.beagleboard.org/images/bone-debian-7.5-2014-05-14-2gb.img.xz
Write image to SD card. Here is example on my Linux laptop:
$ sudo dd if=/home/afustini/Downloads/bone-debian-7.5-2014-05-14-2gb.img of=/dev/sdc
Boot the BeagleBone with the microSD card and verify it is running Linux kernel 3.8.13-bone50:
$ cat /proc/version
Linux version 3.8.13-bone50 (root@imx6q-wandboard-2gb-0) (gcc version 4.6.3 (Debian 4.6.3-14) ) #1 SMP Tue May 13 13:24:52 UTC 2014
$ cat /etc/dogtag
BeagleBoard.org BeagleBone Debian Image 2014-05-14
Step 2: Expand SD card to ensure full capacity
Run script to grow the filesystem as root on BeagleBone:
$ sudo /opt/scripts/tools/grow_partition.sh
sfdisk: backing up partition layout.
sfdisk: initial calculation.
Disk /dev/mmcblk0: 242560 cylinders, 4 heads, 16 sectors/track
Old situation:
Units = mebibytes of 1048576 bytes, blocks of 1024 bytes, counting from 0
Re-reading the partition table …
BLKRRPART: Device or resource busy
The command to re-read the partition table failed.
Run partprobe(8), kpartx(8) or reboot your system now,
before using mkfs
If you created or changed a DOS partition, /dev/foo7, say, then use dd(1)
to zero the first 512 bytes: dd if=/dev/zero of=/dev/foo7 bs=512 count=1
(See fdisk(8).)
Reboot the BeagleBone and verify that the root filesystem now is using the entire capacity of the the microSD card:
$ df -h
Filesystem Size Used Avail Use% Mounted on
rootfs 7.2G 1.6G 5.4G 22% /
Step 3: Install prebuilt fbtft drivers
Download the prebuilt fbtft kernel modules:
$ wget tronnes.org/downloads/fbtft-2014-02-07-3.8.13-bone50.tar.gz
Install the kernel modules:
$ sudo tar -zxPvf fbtft-2014-02-07-3.8.13-bone50.tar.gz
/lib/modules/3.8.13-bone50/extra/
/lib/modules/3.8.13-bone50/extra/fb_pcd8544.ko
/lib/modules/3.8.13-bone50/extra/fb_ili9340.ko
/lib/modules/3.8.13-bone50/extra/fbtft.ko
$ sudo depmod
Verify the modules are for 3.8.13-bone50:
$ modinfo fbtft
filename: /lib/modules/3.8.13-bone50/extra/fbtft.ko
license: GPL
srcversion: 3C6839F44999EEA4C1D8A9F
depends:
vermagic: 3.8.13-bone50 SMP mod_unload modversions ARMv7 thumb2 p2v8
parm: debug:override device debug level (ulong)
parm: dma:Use DMA buffer (bool)
Edit /boot/uboot/uEnv.txt to disable HDMI & eMMC “virtual capes” and enable SPIDEV1 “virtual cape”:
$ sudo vi /boot/uboot/uEnv.txt
Uncomment this cape_disable line for HDMI & eMMC:
##BeagleBone Black:
##Disable HDMI/eMMC
cape_disable=capemgr.disable_partno=BB-BONELT-HDMI,BB-BONELT-HDMIN,BB-BONE-EMMC-2G
Add this line to enable SPIDEV1:
cape_enable=capemgr.enable_partno=BB-SPIDEV1
Save the changes uEnv.txt & reboot the BeagleBone
Step 4: Load fbtft driver
Verify which capes are loaded:
$ cat /sys/devices/bone_capemgr.9/slots
0: 54:PF—
1: 55:PF—
2: 56:PF—
3: 57:PF—
4: ff:P-O– Bone-LT-eMMC-2G,00A0,Texas Instrument,BB-BONE-EMMC-2G
5: ff:P-O– Bone-Black-HDMI,00A0,Texas Instrument,BB-BONELT-HDMI
6: ff:P-O– Bone-Black-HDMIN,00A0,Texas Instrument,BB-BONELT-HDMIN
7: ff:P-O-L Override Board Name,00A0,Override Manuf,BB-SPIDEV1
Use fbtft_device kernel module to load the fb_st7735r driver for Adafruit 1.8″ TFT LCD display connected to SPI1:
$ sudo modprobe fbtft_device busnum=1 name=adafruit18 debug=7 verbose=3 gpios=dc:48,reset:60
OR
Use fbtft_device kernel module to load the fb_ili9340 driver for Adafruit 2.2″ TFT LCD display connected to SPI1:
$ sudo modprobe fbtft_device busnum=1 name=adafruit22a debug=7 verbose=3 gpios=dc:48,reset:60
NOTE: a suffix is important in adafruit22a
/dev/fb0 device should now exist:
$ ls -lsda /dev/fb*
0 crw-rw—T 1 root video 29, 0 Oct 30 06:27 /dev/fb0
The system console should now be displayed on the LCD:

More photos of fbtft working for 1.8″ & 2.2″ TFT LCDs
Example kernel log:
[ 181.848604] fbtft_device: SPI devices registered:
[ 181.848671] fbtft_device: spidev spi1.1 16000kHz 8 bits mode=0x00
[ 181.848705] fbtft_device: spidev spi1.0 16000kHz 8 bits mode=0x01
[ 181.848728] fbtft_device: ‘fb’ Platform devices registered:
[ 181.848860] fbtft_device: omapfb id=-1 pdata? yes
[ 181.849152] fbtft_device: Deleting spi1.0
[ 181.851923] fbtft_device: GPIOS used by ‘adafruit22a’:
[ 181.851960] fbtft_device: ‘dc’ = GPIO48
[ 181.851982] fbtft_device: ‘reset’ = GPIO60
[ 181.852002] fbtft_device: SPI devices registered:
[ 181.852033] fbtft_device: spidev spi1.1 16000kHz 8 bits mode=0x00
[ 181.852061] fbtft_device: fb_ili9340 spi1.0 32000kHz 8 bits mode=0x00
[ 182.235255] Console: switching to colour frame buffer device 60×53
[ 182.236682] graphics fb0: fb_ili9340 frame buffer, 240×320, 150 KiB video memory, 4 KiB DMA buffer memory, fps=20, spi1.0 at 32 MHz
Step 5: Display images and video
Based on FBTFT Wiki article: Framebuffer use
When using a fresh Debian image, one should first update the list of available packages before attempting to install new packages:
$ sudo apt-get update
Reading package lists… Done
W: There is no public key available for the following key IDs:
9D6D8F6BC857C906
Fix public key ID warning:
$ sudo apt-get install debian-keyring debian-archive-keyring
$ sudo apt-get update
Install fbi utility to display image files on the framebuffer device:
$ sudo apt-get install fbi
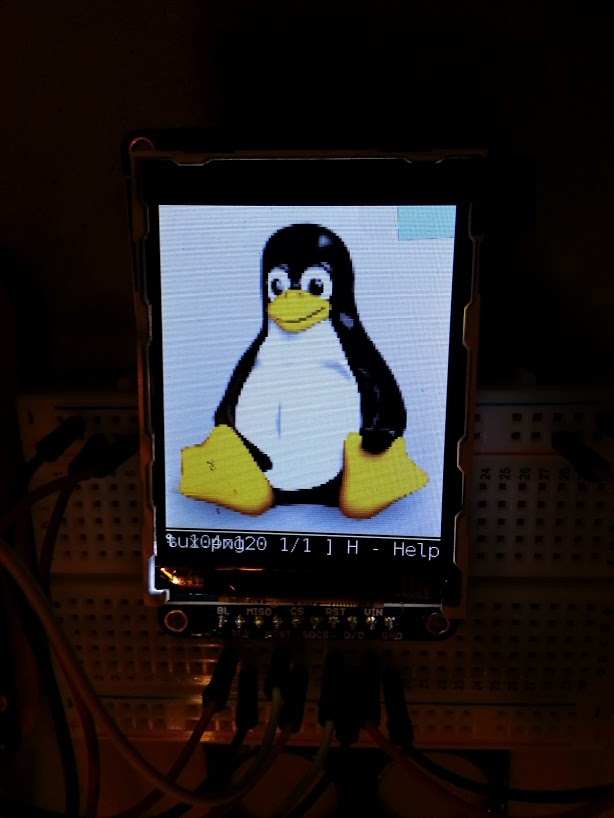
$ wget https://kernel.org/theme/images/logos/tux.png
$ sudo fbi -d /dev/fb0 -T 1 -a tux.png
using “DejaVu Sans Mono-16”, pixelsize=16.67 file=/usr/share/fonts/truetype/ttf-dejavu/DejaVuSansMono.ttf
Tux the Linux mascot should now be displayed on the LCD:

More photos of fbtft working for 1.8″ & 2.2″ TFT LCDs
Next, install mplayer to play a MPEG-2 video clip:
$ sudo apt-get install mplayer
$ wget http://hubblesource.stsci.edu/sources/video/clips/details/images/hst_1.mpg
$ sudo mplayer -nolirc -vo fbdev:/dev/fb0 scale=WIDTH:128 hst_1.mpg
MPlayer svn r34540 (Debian), built with gcc-4.6 (C) 2000-2012 MPlayer Team
framebuffer too small for double-buffering, disabling
V: 19.0 570/570 20% 65% 0.0% 0 0
Exiting… (End of file)
You should now see the video clip playing on the display:

Comments are not currently available for this post.