Categories: BeagleBone Blue, Intermediate, Robotics
Hello,
I first want to start off with these tidbits of info:
- Rover seems easy to install on the BBBlue at first
- Cross-compilation is an option
- Native-compilation is another option (this will take a long time)
- Getting everything correct…priceless
Here is the controller:

Here is the receiver used:
Here is the battery and ESC used:
Do not forget the BBBlue:
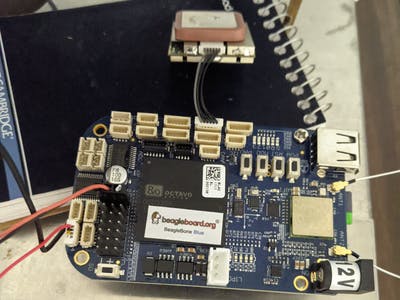
The photo is pictured here with a connection to a GPS unit I purchased. You can find them here:
https://www.sparkfun.com/products/12751
.
Also, if you need assistance with this article or any other ArduPilot (Rover) ideas, please see this site:
https://discuss.ardupilot.org/c/ardurover/8
.
Now, here is one view of the machine built with the chains, sprockets, and axle along with the two, DC Motors:
I actually took this barebones contraption to the Maker Faire in Lafayette, LA in 2021 a couple of months back. It was a small venue and had only children interested as I did not have enough time to put in real work on the product.
…
Okay. Now, how can we get the ArduPilot source on the BBBlue? How can we make a bootable instance of Rover start on a console image from the
Beagleboard.org
foundation?
Well…
It goes a little like this and some of this info. is dedicated to Rover 3.6 from
github.com/imfatant/test
.
So…here we go or you can look over his/her link on github that I just listed…
- grab an image from
beagleboard.org/latest-images
or by looking through these images located here:
https://elinux.org/Beagleboard:BeagleBoneBlack_Debian#Debian_Buster_Console_Snapshot - Now, follow the instructions here,
https://staging.digitalblender.co/getting-started
, to install the image on the BBBlue. - sudo apt update && sudo apt upgrade
sudo apt-get -y dist-upgradesudo apt-get install -y cpufrequtils git- Update scripts:
cd /opt/scripts && git pull - Specify real-time kernel 4_19:
sudo /opt/scripts/tools/update_kernel.sh --lts-4_19 --ti-rt-channel - Specify device tree binary to be used at startup:
sudo sed -i 's/#dtb=/dtb=am335x-boneblue.dtb/g' /boot/uEnv.txt - Specify device tree overlays:
sudo sed -i 's|#dtb_overlay=/lib/firmware/<file8>.dtbo|dtb_overlay=/lib/firmware/BB-I2C1-00A0.dtbo\n#dtb_overlay=/lib/firmware/BB-UART4-00A0.dtbo\n#dtb_overlay=/lib/firmware/BB-ADC-00A0.dtbo|g' /boot/uEnv.txt - Specify U-Boot overlay:
sudo sed -i 's|uboot_overlay_pru=/lib/firmware/AM335X-PRU-RPROC-4-19-TI-00A0.dtbo|#uboot_overlay_pru=/lib/firmware/AM335X-PRU-RPROC-4-19-TI-00A0.dtbo|g' /boot/uEnv.txt - (cont.)
sudo sed -i 's|#uboot_overlay_pru=/lib/firmware/AM335X-PRU-UIO-00A0.dtbo|uboot_overlay_pru=/lib/firmware/AM335X-PRU-UIO-00A0.dtbo|g' /boot/uEnv.txt - Set clock frequency:
sudo sed -i 's/GOVERNOR="ondemand"/GOVERNOR="performance"/g' /etc/init.d/cpufrequtils You:
You may also need Python2 instead of Python3 for installing the ArduPilot source with./waf but we shall get to that idea later…- easily, that can be done w/ sudo apt install python and for python3, use sudo apt install python3.
- Okay…somewhere during this discussion, use this command to inflate the SD Card to the maximum GB, hopefully you have chosen a SD Card over 4 GB for testing,
sudo /opt/scripts/tools/grow_partition.sh
.
REBOOT!
Now, we need to make a couple of files.
First, use the most useful text editor of your choice, emacs, vi, vim, nano, and etc…
Step One
:
sudo nano
/etc/default/ardupilot
and place this info. below in it.
Where it says <target IP address>, please type your IP Address of your development desktop or laptop that you will use for your connection to Mission Planner or if using a Ubuntu or Debian Distro, apm Planner. So, if your IP Address is 192.168.0.12, type that in that location in the file.
TELEM1="-C /dev/ttyO1"
TELEM2="-A udp:<target IP address>:14550"
GPS="-B /dev/ttyO2"
Step Two
:
sudo nano /etc/systemd/system/Rover.service
In this.service file for booting the ArduPilot Rover source, you can see what is listed on the github repo. You can alter it to suit your needs.
[Unit]

Description=ArduRover Service

After=networking.service

StartLimitIntervalSec=0

Conflicts=arducopter.service arduplane.service antennatracker.service


[Service]

EnvironmentFile=/etc/default/ardupilot

ExecStartPre=/usr/bin/ardupilot/aphw

ExecStart=/usr/bin/ardupilot/ardurover $TELEM1 $TELEM2 $GPS


Restart=on-failure

RestartSec=1


[Install]

WantedBy=multi-user.target
…
Step Three
:
sudo mkdir -p /usr/bin/ardupilot
Now…we need to make a file in this dir called whatever. The repo. used a file called aphw (I guess it means ArduPilot Hardware).
#!/bin/bash

# aphw

# ArduPilot hardware configuration.


/bin/echo 80 >/sys/class/gpio/export

/bin/echo out >/sys/class/gpio/gpio80/direction

/bin/echo 1 >/sys/class/gpio/gpio80/value

/bin/echo pruecapin_pu >/sys/devices/platform/ocp/ocp:P8_15_pinmux/state
We need the GPIO pin for powering the Servo Headers on the BBBlue. The pru pin is highlighted above so we can use it to handle the source to the BBBlue from the ESC hardware.
Now, we can set the correct permissions on the files in /usr/bin/ardupilot by using this command: chmod a+x a* or we can use 0755 instead of a+x.
chmod handles our permissions of files and allows us to use them as executables.
https://github.com/imfatant/test/blob/master/bin/ardurover
is a file we will need to obtain or we can go here,
https://github.com/ArduPilot/ardupilot/blob/master/BUILD.md
, to build the file ourselves and then place it on the BBBlue for use.
again: chmod a+x /usr/bin/ardupilot/a*
Anyway, you can use that ardurover file, although ‘outdated, ‘ to handle Rover 3.4.
So, now…
sudo apt-get install g++ make pkg-config python python-dev python-lxml python-pip

sudo pip install future

git clone https://github.com/ArduPilot/ardupilot

cd ardupilot

git branch -a  # <-- See all available branches.

git checkout Rover-3.4  # <-- Select one of the Rover branches.

git submodule update --init --recursive

./waf configure --board=blue  # <-- BeagleBone Blue.

./waf

sudo cp ./build/blue/bin/a* /usr/bin/ardupilot
That Rover 3.4 may or may not work. You have to test, test, and test. If you have made it this far in this short article, you may want to learn more about ArduPilot and the
Beagleboard.org
BeagleBone Blue. I think the.org may produce a newly revised BBBlue one day (hopefully).
If you have trouble w/ that Native-compilation, you can always follow the Cross-Compilation from /Build.md file from above on the github repo of ArduPilot.
Once this is completed:
chmod a+x /usr/bin/ardupilot/a*
This will ensure everything is executable for running the.service file.
So, we have our machinery, the source, and the parts. Yes!
Now, we can put everything together and attempt a run.
The PRU pin on the 4th quadrature encoder connector on the BBBlue is what we use. It is the left-most pin on that connector. Most left, 4th connector. It has four pins in it and it is on the end of the board.
So, we need to make sure on our Archer Pro S8R from FrSky that we connect things properly: Please do not power your board while handling wires. No hot plugging allowed or you may introduce errors to the processor or damage yourself.
- BBBlue PRU pin to SBus Signal Output
- First test the signal coming out of the SBus Signal Output on the Archer Pro receiver. Make sure it is 3.3v and not 5v. You do not want to harm the BBBlue and its processor, i.e. the am335x and/or PRU which is part of the package of the SiP.
- Do not power everything until you have tested the output of your receiver and other modules if adding GPS or another type of module.
- The Receiver power gives out 5v while the signal outputs 3.3v says FrSky but testing must take place to ensure this fact.
- The ESC is easily configured as a skid style tank or a forward/backward by one gimbal and then the other gimbal handles a bit of left to right movement by a switch on it. There is a tiny switch that can be set left or right depending on your needs.
- So, the other parts to the receiver plug into, the BBBlue Servo Headers. Make sure signal is gone on this wire harness. Remove it simply by clipping it off at the base of the connector.
- Now, we need to plug in the wires from the ESC to the Receiver.
- I have put together a cheap schematic on how to handle the connections. If you are an avid user of electronics, this section should be easy enough.
- If not and if you are new to the entire idea, enjoy!
Sometimes, a funny schematic is what it is all about. Oh and here are some good photos of the BBBlue:
and…another one:
This may or may not be a good tutorial on how to get ardupilot on the BBBlue but I hope you have enjoyed making it work in time.
Seth
P.S. Wait for videos of funny machines working with ArduPilot and their Rover source.
Test response to Discourse posting of a BB.org project.